Build and deploy ML app with PyCaret and Streamlit
Build and deploy machine learning web app using PyCaret and Streamlit
A beginner’s guide to deploying a machine learning app on Heroku PaaS
by Moez Ali

RECAP
In our last post on deploying a machine learning pipeline in the cloud, we demonstrated how to develop a machine learning pipeline in PyCaret, containerize Flask app with Docker and deploy serverless using AWS Fargate. If you haven’t heard about PyCaret before, you can read this announcement to learn more.
In this tutorial, we will train a machine learning pipeline using PyCaret and create a web app using a Streamlit open-source framework. This web app will be a simple interface for business users to generate predictions on a new dataset using a trained machine learning pipeline.
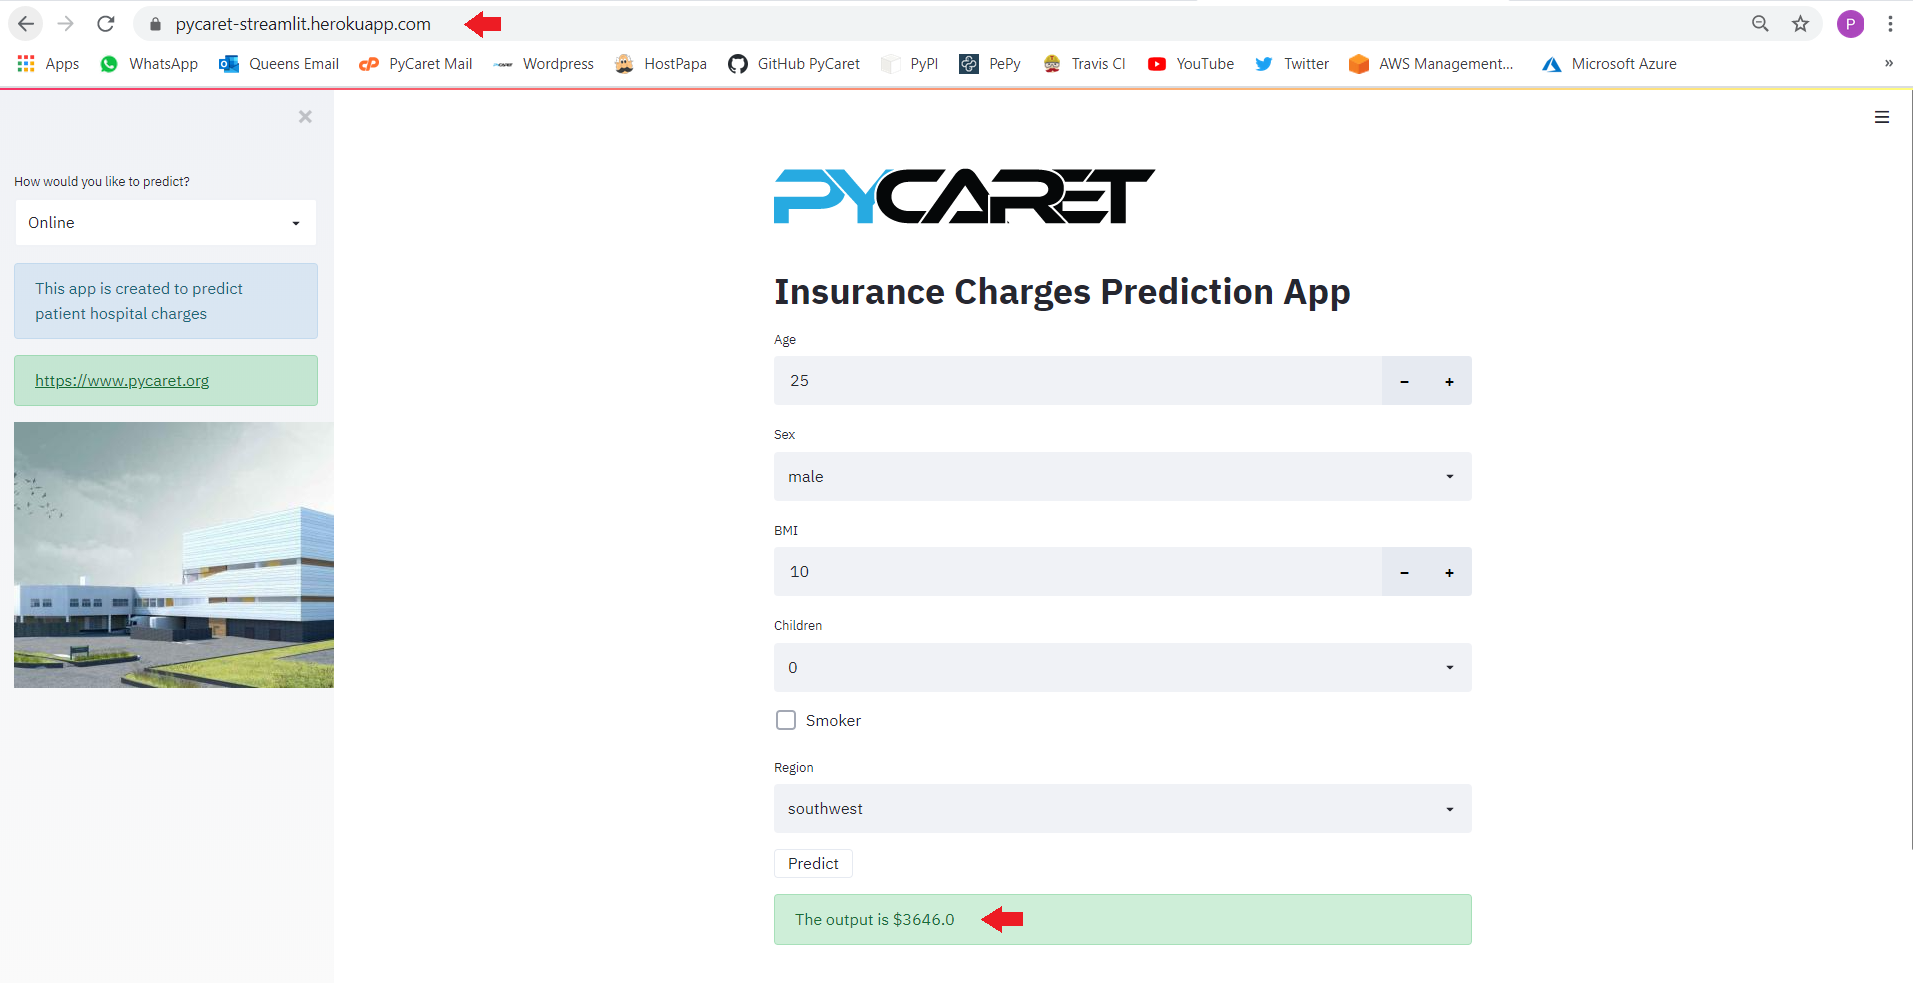
By the end of this tutorial, you will be able to build a fully functional web app to generate online predictions (one-by-one) and predictions by batch (by uploading a csv file) using trained machine learning model. The final app looks like this:
👉 What you will learn in this tutorial
What is a deployment and why do we deploy machine learning models?
Develop a machine learning pipeline and train models using PyCaret.
Build a simple web app using a Streamlit open-source framework.
Deploy a web app on ‘Heroku’ and see the model in action.
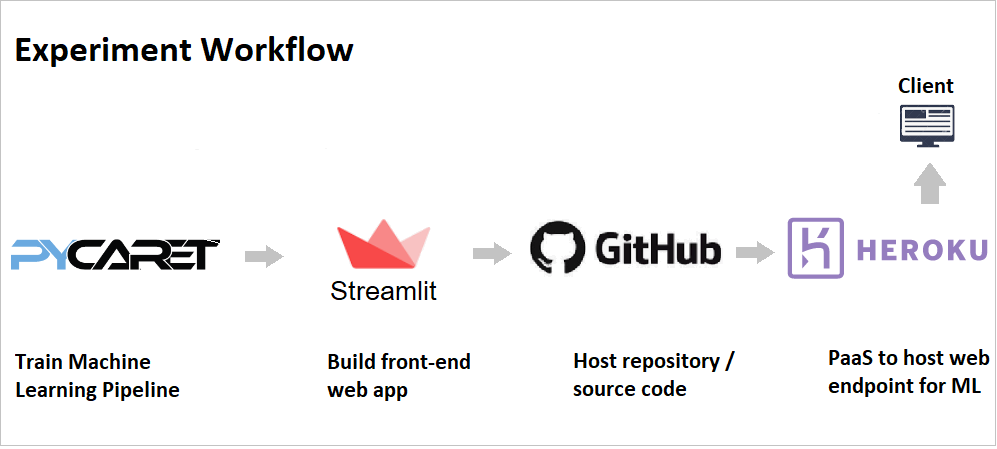
This tutorial will cover the entire workflow starting from training a machine learning model and developing a pipeline in Python, developing a simple web app using streamlit and deploying the app on the Heroku cloud platform.
In the past, we have covered containerization using docker and deployment on cloud platforms like Azure, GCP and AWS. If you are interested in learning more about those, you can read the following stories:
💻 Toolbox for this tutorial
PyCaret
PyCaret is an open source, low-code machine learning library in Python that is used to train and deploy machine learning pipelines and models into production. PyCaret can be installed easily using pip.
Streamlit
Streamlit is an open-source Python library that makes it easy to build beautiful custom web-apps for machine learning and data science. Streamlit can be installed easily using pip.
GitHub
GitHub is a cloud-based service that is used to host, manage and control code. Imagine you are working in a large team where multiple people (sometimes hundreds of them) are making changes. PyCaret is itself an example of an open-source project where hundreds of community developers are continuously contributing to source code. If you haven’t used GitHub before, you can sign up for a free account.
Heroku
Heroku is a platform as a service (PaaS) that enables the deployment of web apps based on a managed container system, with integrated data services and a powerful ecosystem. In simple words, this will allow you to take the application from your local machine to the cloud so that anybody can access it using a Web URL. In this tutorial, we have chosen Heroku for deployment as it provides free resource hours when you sign up for a new account.
✔️Let’s get started…..
Why Deploy Machine Learning Models?
Deployment of machine learning models is the process of putting models into production so that web applications, enterprise software and APIs can consume a trained model and generate predictions with new data points.
Normally machine learning models are built so that they can be used to predict an outcome (binary value i.e. 1 or 0 for Classification, continuous values for Regression, labels for Clustering etc. There are two broad ways to predict new data points:
👉 Online Predictions
Online prediction scenarios are for cases where you want to generate predictions on a one-by-one basis for each datapoint. For example, you could use predictions to make immediate decisions about whether a particular transaction is likely to be fraudulent.
👉 Batch Predictions
Batch prediction is useful when you want to generate predictions for a set of observations all at once. For example, if you want to decide which customers to target as part of an advertisement campaign for a product you would get prediction scores for all customers, sort these to identify which customers are most likely to purchase, and then target maybe the top 5% customers that are most likely to purchase.
In this tutorial we will build an app that can do both; online prediction as well as batch prediction by uploading a csv file containing new data points.
Setting the Business Context
An insurance company wants to improve its cash flow forecasting by better predicting patient charges using demographic and basic patient health risk metrics at the time of hospitalization.

Objective
To build a web application that supports online (one-by-one) as well as batch prediction using trained machine learning model and pipeline.
Tasks
Train, validate and develop a machine learning pipeline using PyCaret.
Build a front-end web application with two functionalities: (i) online prediction and (ii) batch prediction.
Deploy the web app on Heroku. Once deployed, it will become publicly available and can be accessed via Web URL.
👉 Task 1 — Model Training and Validation
Training and model validation are performed in an Integrated Development Environment (IDE) or Notebook either on your local machine or on cloud. If you haven’t used PyCaret before, click here to learn more about PyCaret or see Getting Started Tutorials on our website.
In this tutorial, we have performed two experiments. The first experiment is performed with default preprocessing settings in PyCaret. The second experiment has some additional preprocessing tasks such as scaling and normalization, automatic feature engineering and binning continuous data into intervals. See the setup code for the second experiment:

The magic happens with only a few lines of code. Notice that in Experiment 2 the transformed dataset has 62 features for training derived from only 6 features in the original dataset. All of the new features are the result of transformations and automatic feature engineering in PyCaret.

Sample code for model training in PyCaret:
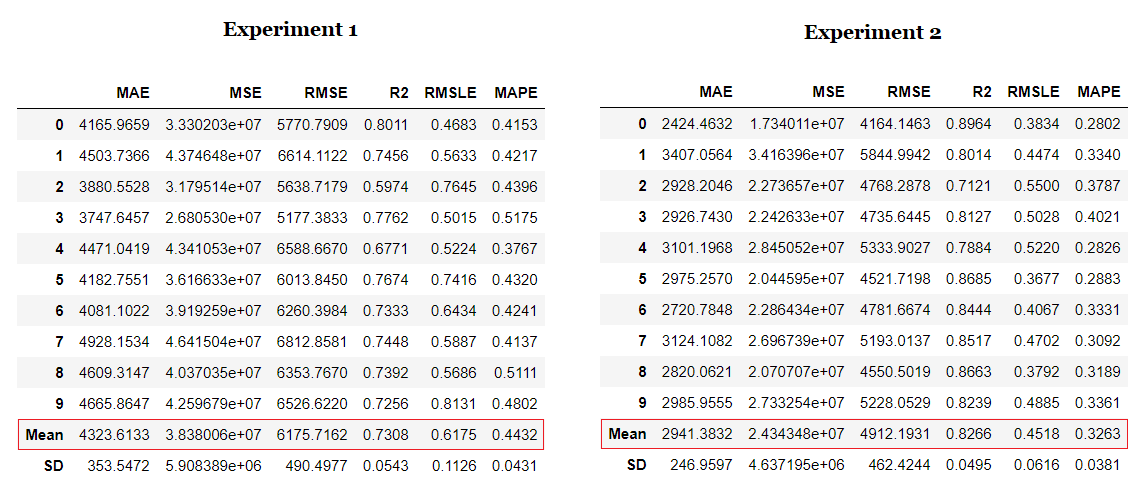
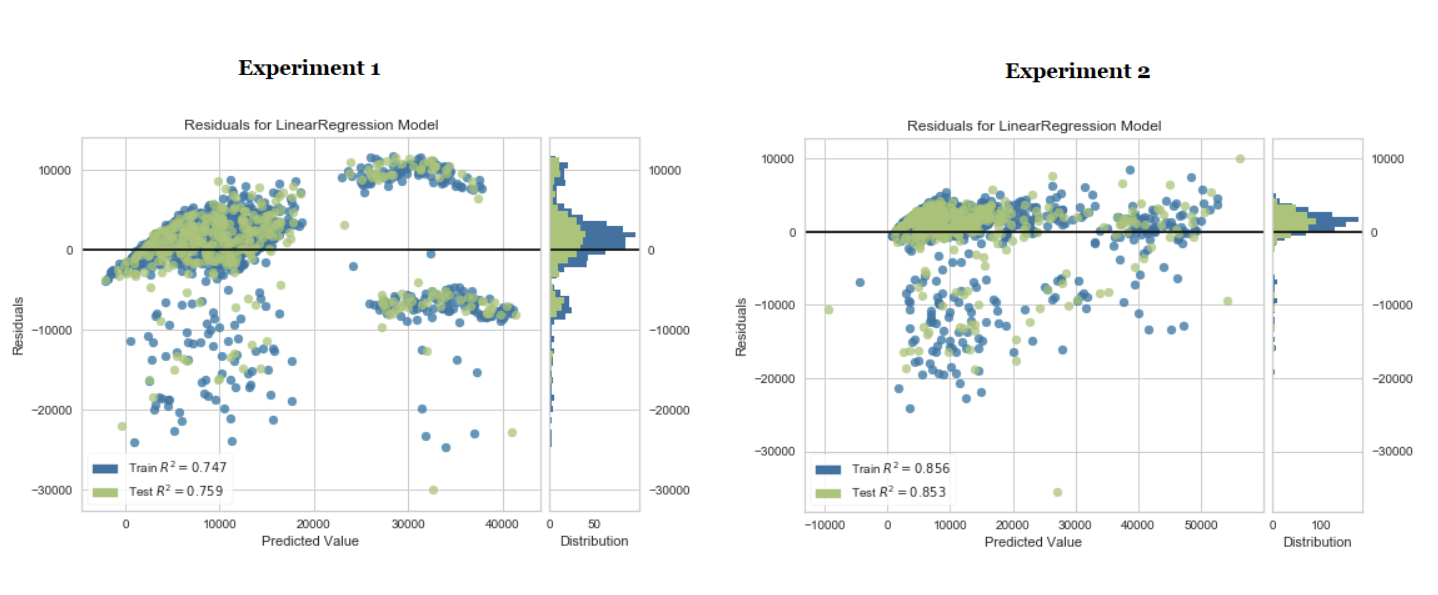
Notice the impact of transformations and automatic feature engineering. The R2 has increased by 10% with very little effort. We can compare the residual plot of linear regression model for both experiments and observe the impact of transformations and feature engineering on the **heteroskedasticity **of model.
Machine learning is an iterative process. The number of iterations and techniques used within are dependent on how critical the task is and what the impact will be if predictions are wrong. The severity and impact of a machine learning model to predict a patient outcome in real-time in the ICU of a hospital is far more than a model built to predict customer churn.
In this tutorial, we have performed only two iterations and the linear regression model from the second experiment will be used for deployment. At this stage, however, the model is still only an object within a Notebook / IDE. To save it as a file that can be transferred to and consumed by other applications, execute the following code:
When you save a model in PyCaret, the entire transformation pipeline based on the configuration defined in the **setup() **function is created. All inter-dependencies are orchestrated automatically. See the pipeline and model stored in the ‘deployment_28042020’ variable:
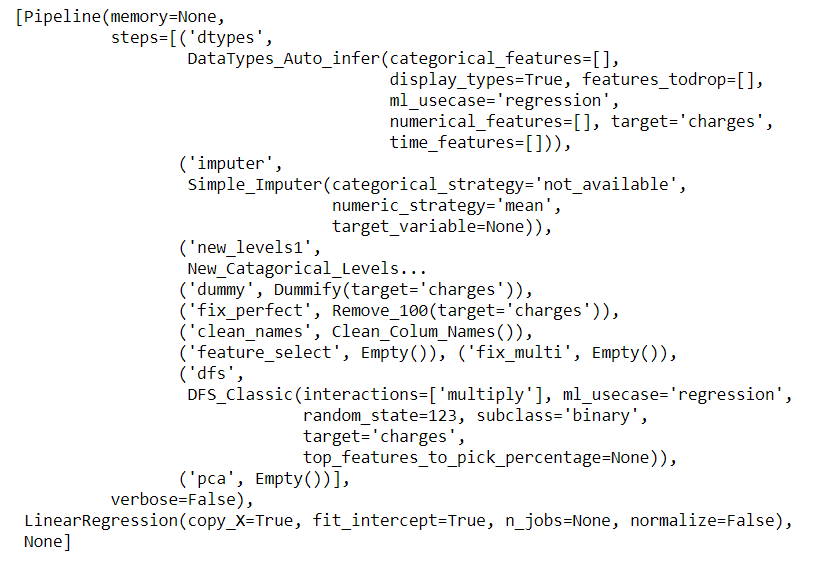
We have finished training and model selection. The final machine learning pipeline and linear regression model is now saved as a pickle file (deployment_28042020.pkl) that will be used in a web application to generate predictions on new datapoints.
👉 Task 2 — Building Web Application
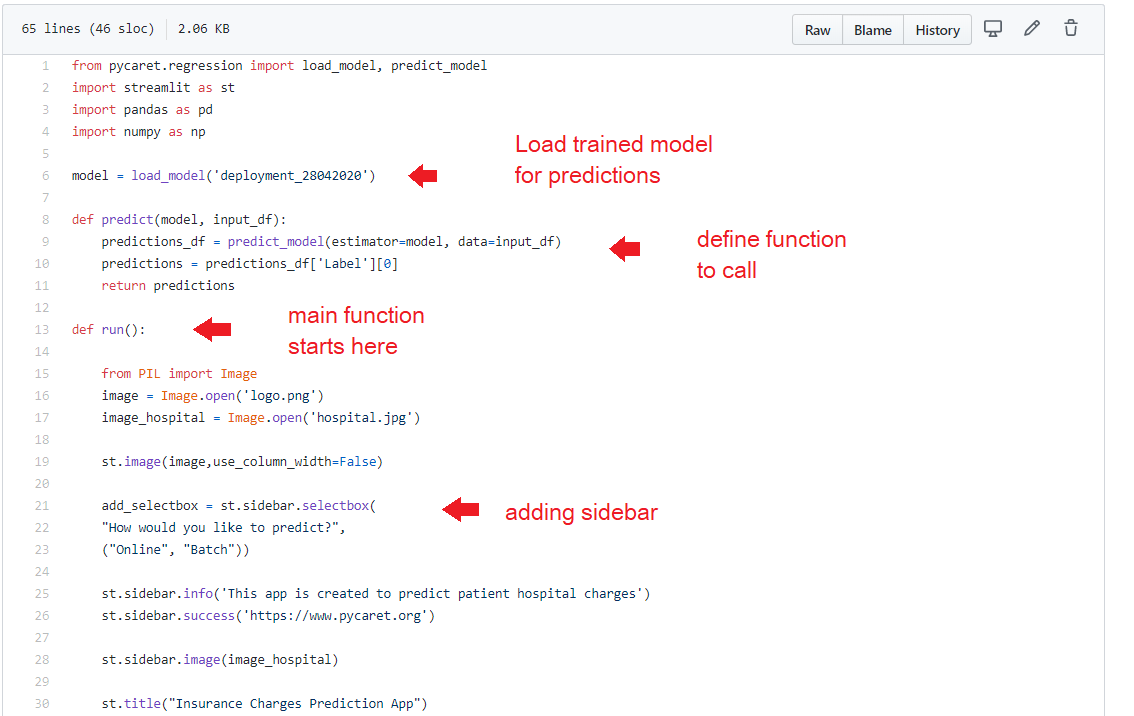
Now that our machine learning pipeline and model are ready we will start building a front-end web application that can generate predictions on new datapoints. This application will support ‘Online’ as well as ‘Batch’ predictions through a csv file upload. Let’s breakdown the application code into three main parts:
Header / Layout
This section imports libraries, loads the trained model and creates a basic layout with a logo on top, a jpg image and a dropdown menu on the sidebar to toggle between ‘Online’ and ‘Batch’ prediction.
Online Predictions
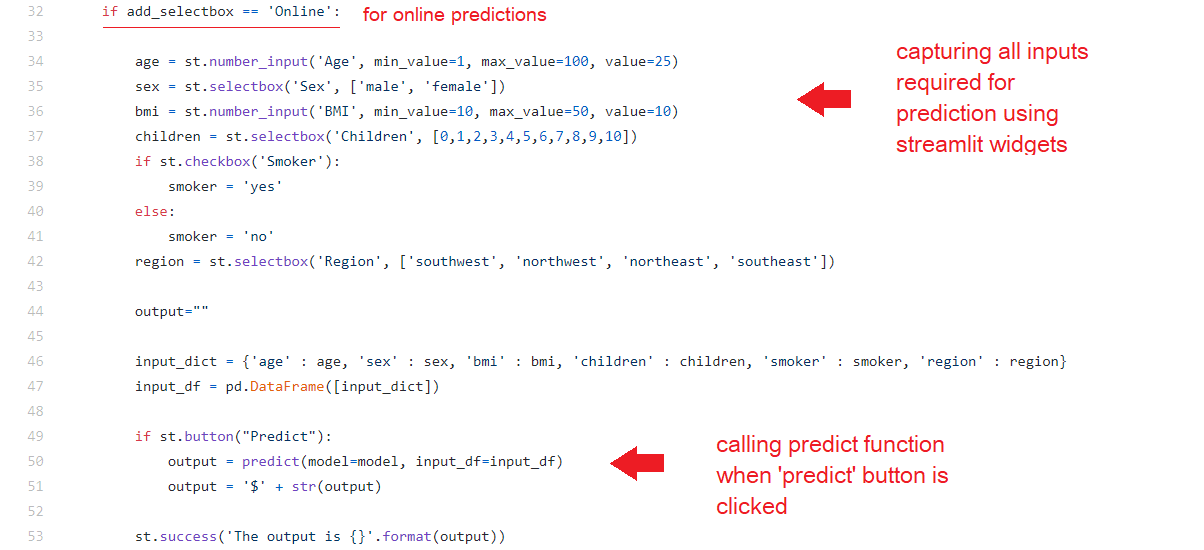
This section deals with the first functionality of the app i.e. Online (one-by-one) prediction. We are using streamlit widgets such as number input, text input, drop down menu and checkbox to collect the datapoints used to train the model such as Age, Sex, BMI, Children, Smoker, Region.
Batch Predictions
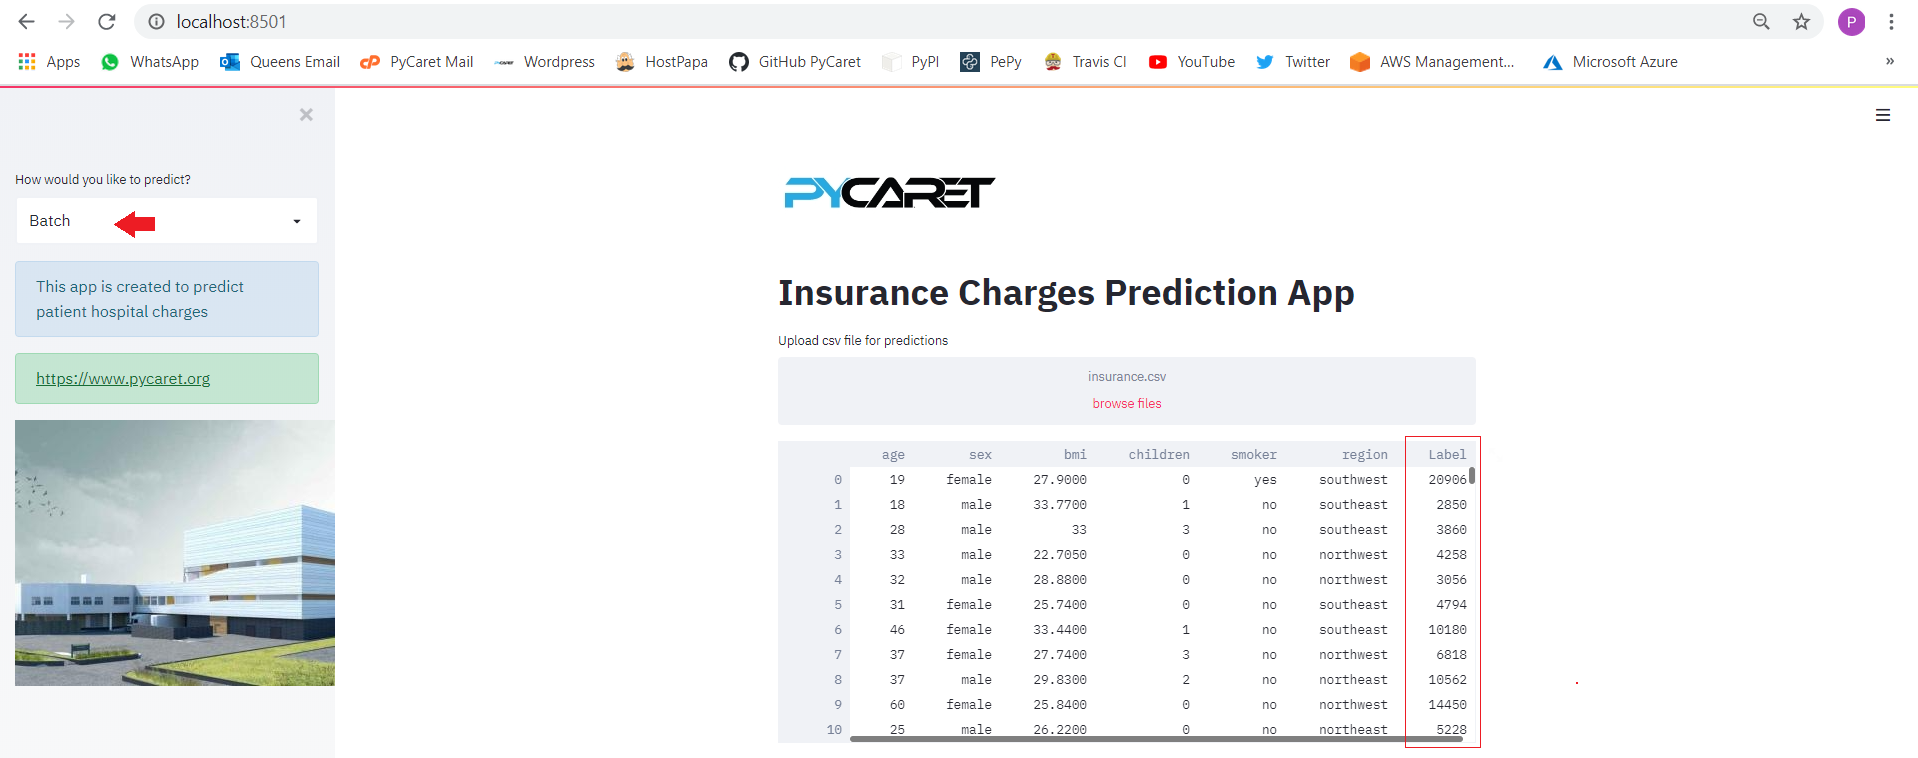
This part deals with the second functionality i.e. prediction by batch. We have used the file_uploader widget of streamlit to upload a csv file and then called the native **predict_model() **function from PyCaret to generate predictions that are displayed used streamlit’s write() function.

If you remember from Task 1 above we finalized a linear regression model that was trained on 62 features that were extracted using 6 original features. However, the front-end of our web application has an input form that collects only the six features i.e. age, sex, bmi, children, smoker, region.
How do we transform the 6 features of a new data point into 62 used to train the model? We do not need to worry about this part as PyCaret automatically handles this by orchestrating the transformation pipeline. When you call the predict function on a model trained using PyCaret, all transformations are applied automatically (in sequence) before generating predictions from the trained model.
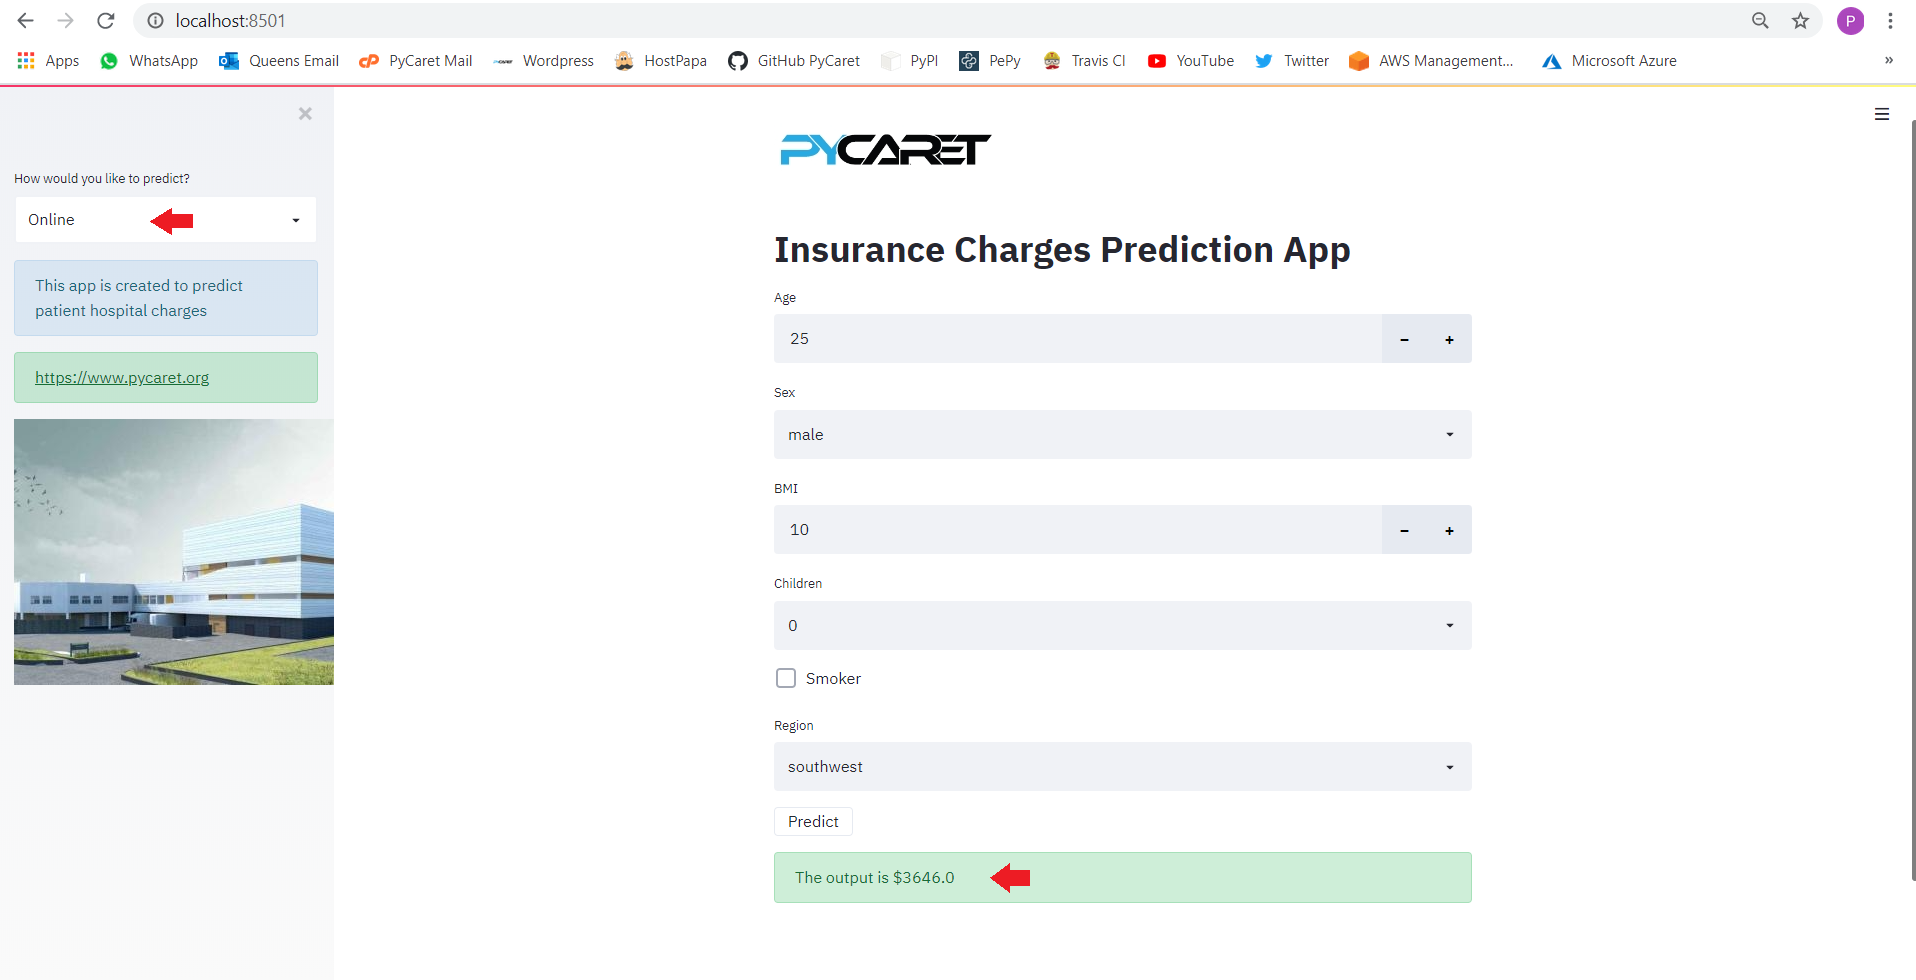
**Testing App **One final step before we publish the application on Heroku is to test the web app locally. Open Anaconda Prompt and navigate to your project folder and execute the following code:
👉 Task 3 — Deploy the Web App on Heroku
Now that the model is trained, the machine learning pipeline is ready, and the application is tested on our local machine, we are ready to start our deployment on Heroku. There are a couple of ways to upload your application source code onto Heroku. The simplest way is to link a GitHub repository to your Heroku account.
If you would like to follow along you can fork this repository from GitHub. If you don’t know how to fork a repo, please read this official GitHub tutorial.
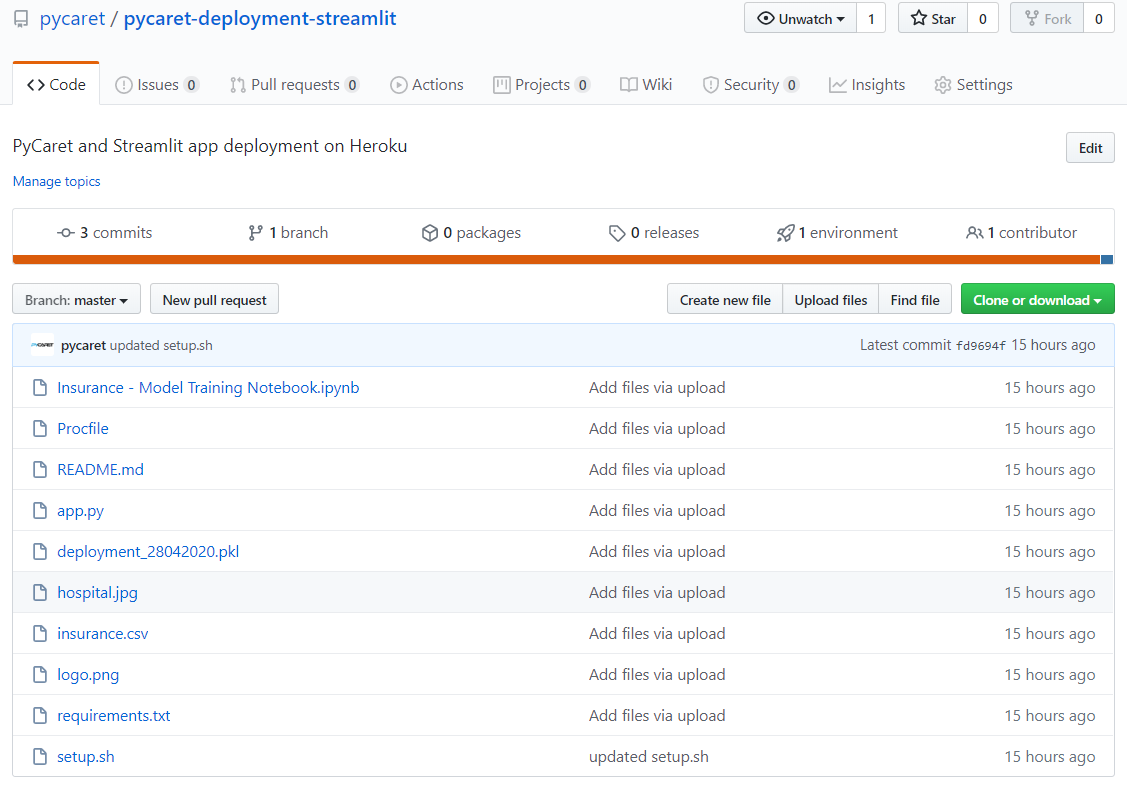
By now you are familiar with all of the files in the repository except for three files: ‘requirements.txt’ , ‘setup.sh’ and ‘Procfile’. Let’s see what those are:
requirements.txt
**requirements.txt **file is a text file containing the names of the python packages required to execute the application. If these packages are not installed in the environment where the application is running, it will fail.

setup.sh
setup.sh is a script programmed for bash. It contains instructions written in the Bash language and like requirements.txt, **it is used for creating the necessary environment for our streamlit app to run on the cloud.

Procfile
Procfile is simply one line of code that provides startup instructions to the web server that indicate which file should be executed when an application is triggered. In this example, ‘Procfile’ is used for executing **setup.sh **which will create the necessary environment for the streamlit app and the second part “streamlit run app.py” is to execute the application (this is similar to how you would execute a streamlit application on your local computer).

Once all the files are uploaded onto the GitHub repository, we are now ready to start deployment on Heroku. Follow the steps below:
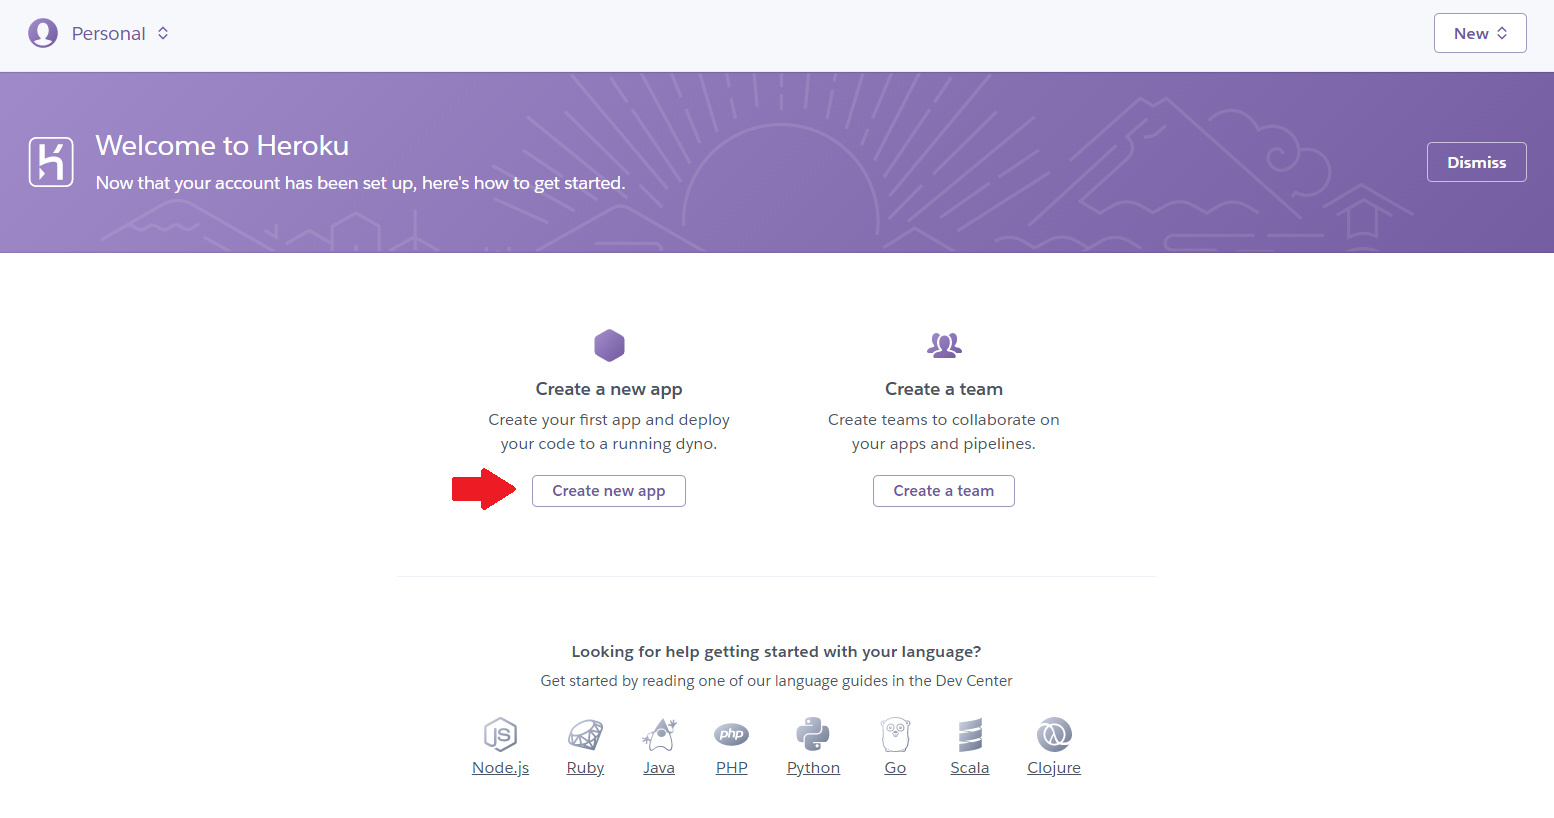
Step 1 — Sign up on heroku.com and click on ‘Create new app’
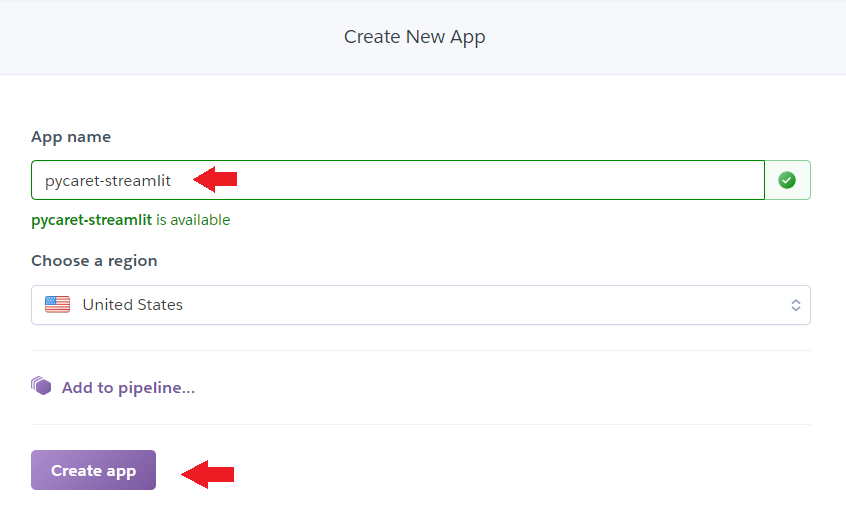
Step 2 — Enter App name and region
Step 3 — Connect to your GitHub repository
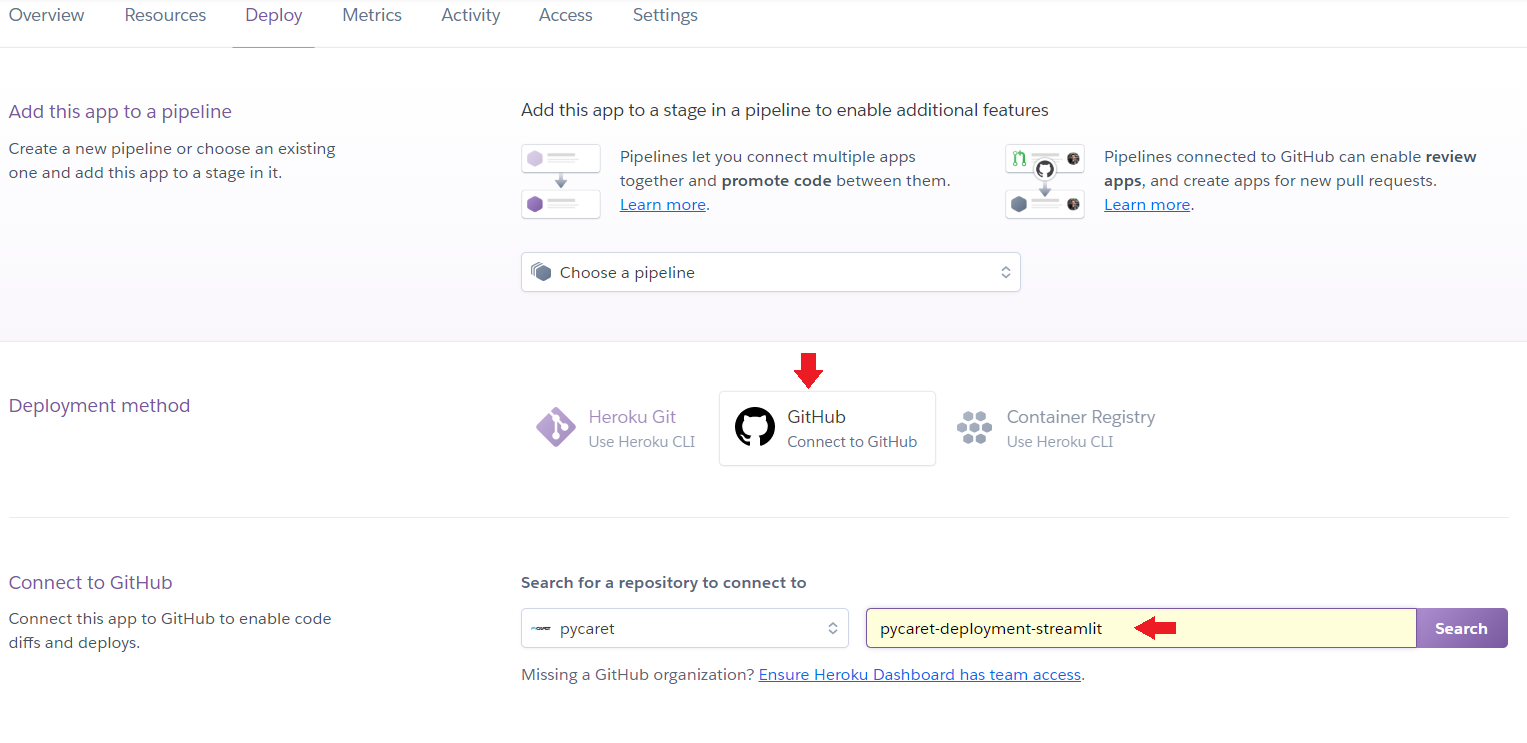
Step 4 — Deploy branch
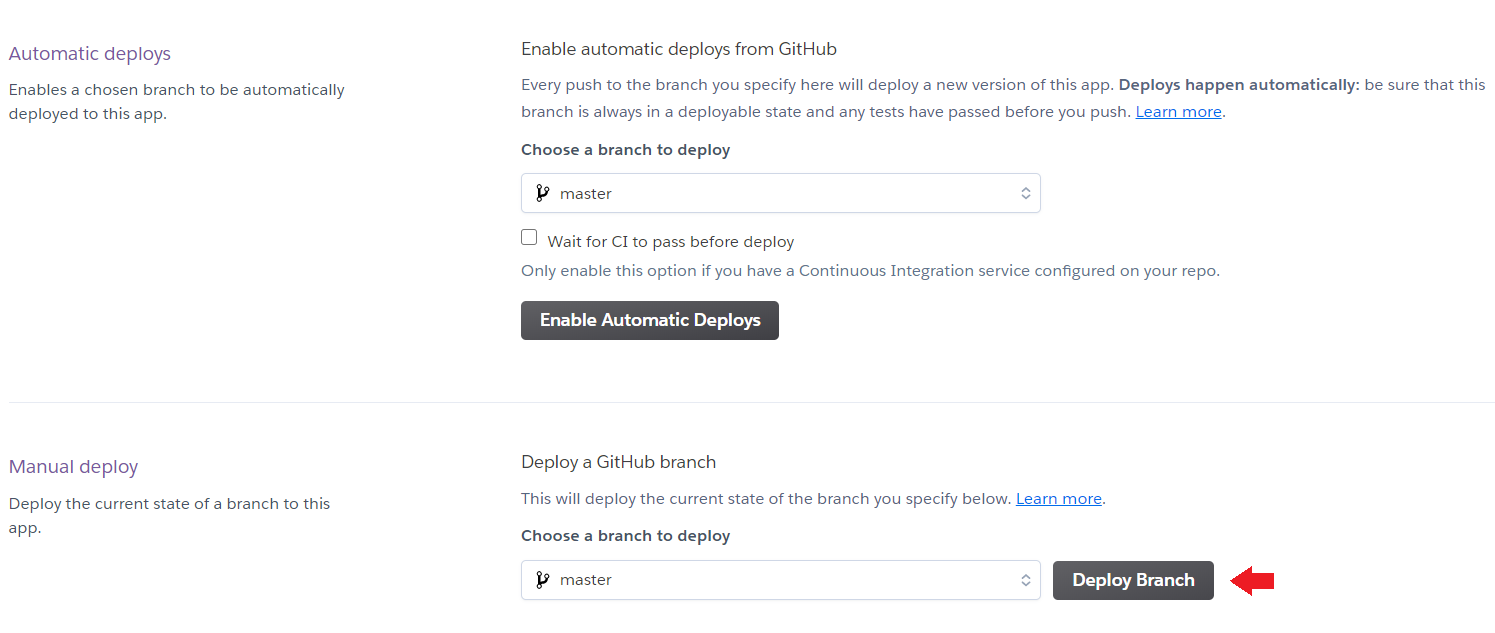
Step 5 — Wait 10 minutes and BOOM
App is published to URL: https://pycaret-streamlit.herokuapp.com/

PyCaret 2.0.0 is coming!
We have received overwhelming support and feedback from the community. We are actively working on improving PyCaret and preparing for our next release. PyCaret 2.0.0 will be bigger and better. If you would like to share your feedback and help us improve further, you may fill this form on the website or leave a comment on our GitHub or LinkedIn page.
Follow our LinkedIn and subscribe to our YouTube channel to learn more about PyCaret.
Want to learn about a specific module?
As of the first release 1.0.0, PyCaret has the following modules available for use. Click on the links below to see the documentation and working examples in Python.
Classification Regression Clustering Anomaly Detection Natural Language Processing Association Rule Mining
Also see:
PyCaret getting started tutorials in Notebook:
Clustering Anomaly Detection Natural Language Processing Association Rule Mining Regression Classification
Would you like to contribute?
PyCaret is an open source project. Everybody is welcome to contribute. If you would like to contribute, please feel free to work on open issues. Pull requests are accepted with unit tests on dev-1.0.1 branch.
Please give us ⭐️ on our GitHub repo if you like PyCaret.
Medium: https://medium.com/@moez_62905/
LinkedIn: https://www.linkedin.com/in/profile-moez/
Twitter: https://twitter.com/moezpycaretorg1
Last updated
Was this helpful?