NLP Text Classification in Python using PyCaret

NLP Text-Classification in Python: PyCaret Approach Vs The Traditional Approach

A comparative analysis between The Traditional Approach and PyCaret Approach

by Prateek Baghel

I. Introduction

In this post we’ll see a demonstration of an NLP-Classification problem with 2 different approaches in python:

1-The Traditional approach: In this approach, we will:

  • preprocess the given text data using different NLP techniques

  • embed the processed text data with different embedding techniques

  • build classification models from more than one ML family on the embedded text data -see the performances of different models and then tune the hyper-parameters of some selected models

  • and finally, see the performance of the tuned models. Clearly, doing so in python means writing hundreds of lines of code and that may take at least two to three hours of your time.

2- The PyCaret approach: A new approach, wherein we use a low-code Python library, PyCaret, to do all the things in the above mentioned traditional approach but we write less than 30 lines of code and get the results and insights in minutes.

To give you an idea about the difference between the two approaches, please take a look at this rough comparison table below:

You can see that PyCaret approach provides many more solutions and functionalities, all in less time and effort!

II. The NLP-Classification Problem

Here the task at hand is to identify whether a given SMS is a Spam or a Ham. Here is a glimpse of the raw data and you can find the raw data from this *Link.* The data set has 5574 SMS to be classified.

As you may have figured it out that this problem is two-staged: NLP on the raw text data, followed by Classification on the processed text data.

Let’s now begin and see the 2 approaches! I’ll share a link of my code on Github at the bottom of this post.

III. Traditional Approach

Stage 1. Data Setup and Preprocessing on the text data

Before preprocessing, we’ll convert the *Flag *column from categorical data type to numeric data type. The resultant dataset looks like this:

Head and Tail of Dataset with Flag column converted into numeric/dummy values

Next, under the preprocessing step, I have performed the following operations on the text data: -removed HTTP tags -lowered the case -removed all punctuation and Unicode -removed stopwords -lemmatization(converting a word into its root form considering the relevant Part of Speech associated with the word)

After performing all of the 5 operations above, the dataset looks like this:

Head and Tail of the dataset after preprocessing operations

Before we begin with embedding, a quick exploratory analysis of most common words and most rare words might give us an idea on how Spam and Ham SMS may differ from each other.

15 most common words: They seem to be mostly appearing in the HAM SMS
15 most rare words: They seem to be mostly appearing in the SPAM SMS

Generally, such exploratory analysis helps us in identifying and removing words that may have very less predictive power(because such words appear in abundance) or that they may have induced noise in the model(because such words appear so rarely). However, I have not dropped any more words from the processed text data and have moved to the embedding stage.

Stage 2. Embedding on the processed text data

I have used two embedding techniques here. a. Bag of Words method: This method creates a term document matrix, wherein every unique word/term becomes a column. In Python, we use *CountVectorizer() *function for BoW embedding.

b. Term Frequency-Inverse Document Frequency method: This method creates a term document matrix, wherein some weight is applied to each term in the matrix. The weights depend on how common a word occurs in a document and in the entire corpus. In Python, we use *TfidfVectorizer() *function for TF-IDF embedding.

Stage 3. Model Building

Before deciding what models to build, I have split the data with 85% of the data(4737 rows) in the Training data set, and the remainder 15%(837 rows) in the Test data set. The testing dataset allows us to asses the model performance on the unseen data

  • Here, I have built classification models from four randomly decided ML families: Random Forest Classifier, Adaboost Classifier, Gradient Boosting Classifier, Naive Bayes Classifier.

  • I have built the above models first on the BoW embedded dataset and then on the TF-IDF embedded dataset.

  • Model performance metrics used are: Confusion Matrix, Accuracy Score, Precision Score, Recall Score, and ROC-AUC score.

  • I am sharing here only the results of the base models(the *hyper-parameters *are not tuned) built on the dataset with BoW embedding. I have shared the model performance results on a dataset with TF-IDF embedding on my Github repository. You can check that on the link provided below:

Stage 4. Hyperparameter Tuning

For convenience, I have done hyper-parameter tuning for models built on the dataset with BoW embedding. Doing same for the models on *TF-IDF *embedded dataset will require repeating and adding around 30–40 **lines of code.

I further decided to go forward with tuning the hyper-parameters for the *Random Forest Classifier *and the *Adaboost Classifier *models as these two models seem to perform better than the other two models. For hyper-parameter tuning, I have used the Grid-Search method.

The same model performances metrics were used as they were earlier: *Confusion Matrix, Accuracy score, Precision score, Recall score, ROC-AUC score. *The results also display tuned hyper-parameter values, as well as the 10-Fold cross-validation value of the Accuracy score of the tuned model.

The following were the performance results of the tuned models :

Comparing the two tuned models, AdaBoost Classifier performs better on Cross Validation Accuracy score.

Now let's explore the PyCaret method..!

IV. PyCaret Approach

We’ll repeat all the steps carried out under the traditional approach, but you’ll notice how quick and easy this approach is.

Stage 1. Data Setup and Preprocessing on the text data

Before performing any ML experiment in PyCaret, you have to set up a PyCaret module environment. This allows for the reproducibility, scalability, and deployment of an ML experiment conducted for more than one time. You can see that it takes only 2 lines of command to do so.

What is great about this function is that it automatically performs all the NLP pre-processing operations(lowering case, removing all the punctuations and stopwords, stemming, lemmatization, and other operations) on your raw text data. This entire step got completed in 21 seconds!

Stage 2. Embedding on the processed text data

PyCaret currently supports Topic Modelling embedding techniques only. In this example, we will use the Latent Dirichlet Allocation(LDA) technique and the *Non-Negative Matrix Factorization(NMF) *technique for embedding. Therefore, it won’t be an apple to apple comparison because we used BoW embedding and TF-IDF embedding in the Traditional Method

The embedding process is much easier in PyCaret. You can see in the snippet below that we need only 2 lines of code to embed the processed data. By default nlp module’s create_model() creates 4 topics. You can change the toping numbers by passing the desired numerical value in this function.

Using the same 2 lines of code but changing the model parameter, you can create a dataset with NMF embedding.

In addition, PyCaret also provides options wiith multiple graphs for exploratory data analysis at this stage. Again you need just 1 line of code to do so. Though, it must be noted that the exploratory data analysis is based on the *Topics *created during the embedding stage.

Stage 3. Model Building

After NLP, the second part of the overall problem is classification. Therefore, we need a different setup environment to perform the classification experiments.

We will build models on both the LDA embedded dataset and the NMF embedded dataset. However, we’ll have to drop unnecessary variables(*SMS, Dominant Topic *etc.) from both the embedded datasets so that classification models can be built upon it.

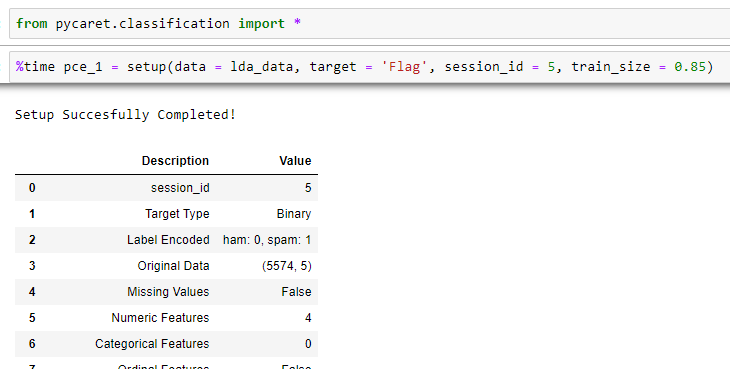
We used PyCaret’s *nlp *module for NLP operation, similarly, we use PyCaret’s classification module for Classification part of the problem. To setup Classification module just 2 lines of code of are required. In addition, we also have to specify the Target Variable and the Train-Test split ratio.

Just like in the *nlp *setup where pre-processing operations are performed automatically, in the *classification *setup, depending upon the data, PyCaret automatically creates new features and preforms other preprocessing steps!

If you thought, setting up PyCaret environment and getting automated feature engineering was easy, model building is even easier! All you have to do is write just one command and see the result!

You can see PyCaret automatically built base models from 18 different ML classification families and arranged the 15 best models in descending order of Accuracy score. It further points out that for a particular performance metric what model performs the best(metric score highlighted in yellow).

All of that done by just 1 command and results were up there in around 1 minute!

We see Random Forest Classifier model performs the best in *Accuracy. *Let's tune Random Forest Classifier model.

Stage 4. Hyperparameter Tuning

This is a 3 step process in PyCaret: Create a model, Tune it, Evaluate its performance. Each of the steps requires just 1 line of code!

Tuning **the Random Forest Classifier built on LDA embedded dataset:

  • In the Input-Output snippet below, each step requires just 1 line of code.

  • In order to create a Random Forest classifier model you have to pass ‘rf’ value

  • You can observe that the tuned model metrics are better than the base model metrics

  • PyCaret offers 15 evaluation plots. Click on any of the 15 tabs to select the evaluation plot you want to use to obtain further insights.

I repeated the same process to tune the models built on the NMF embedded data. I tuned an *Extra Trees Classifier *model this time with a few changes.

  • After setting up a new environment, the results of compare_models() show that the *Extra Trees Classifier *model performs the best, hence I decided to tune it.

  • Here I am repeating the same steps that I followed with LDA embedded data: *create_model(), *then *tune_model(), *and then evaluate_model(). You can observe that to create and tune an *Extra Trees Classifier *model, you have to pass ‘et’ value. This time I decided to optimize the *AUC value *instead of the Accuracy score while tuning the hyper-parameters. To do so, I had to pass *‘AUC’ *value.

V. Comparison of two methods

It can be seen that PyCaret provides solutions, with more options and functionalities, in much fewer lines of code, and even lesser execution time when compared with the traditional method.

I’d like to further point out that comparing the performance results of the models the traditional method with the performance results of the models from the PyCaret method is not an apple to apple comparison, as both methods use different embedding techniques on the text data. We’ll have to wait for a newer version of PyCaret’s nlp-module that supports the embedding techniques used in the traditional method.

However, depending upon the business problem, it is important to see that the time and the effort saved, and the insights options gained under the PyCaret method are far more valuable than getting the evaluation metrics values increased by some decimal values under the traditional method.

Here is the rough comparison table to highlight the key differences between the two approaches again.

Thank you for reading this post. Happy learning!

Last updated