Write and train custom ML models using PyCaret

Write and train your own custom machine learning models using PyCaret

A step-by-step, beginner-friendly tutorial on how to write and train custom machine learning models in PyCaret

PyCaret

PyCaret is an open-source, low-code machine learning library and end-to-end model management tool built-in Python for automating machine learning workflows. It is incredibly popular for its ease of use, simplicity, and ability to quickly and efficiently build and deploy end-to-end ML prototypes.

PyCaret is an alternate low-code library that can replace hundreds of code lines with few lines only. This makes the experiment cycle exponentially fast and efficient.

PyCaret is simple and easy to use. All the operations performed in PyCaret are sequentially stored in a Pipeline that is fully automated for **deployment. **Whether itโ€™s imputing missing values, one-hot-encoding, transforming categorical data, feature engineering, or even hyperparameter tuning, PyCaret automates all of it.

This tutorial assumes that you have some prior knowledge and experience with PyCaret. If you havenโ€™t used it before, no problem โ€” you can get a quick headstart through these tutorials:

Installing PyCaret

Installing PyCaret is very easy and takes only a few minutes. We strongly recommend using a virtual environment to avoid potential conflicts with other libraries.

PyCaretโ€™s default installation is a slim version of pycaret that only installs hard dependencies listed here.

**# install slim version (default)
**pip install pycaret

**# install the full version**
pip install pycaret[full]

When you install the full version of pycaret, all the optional dependencies as listed here are also installed.

๐Ÿ‘‰ Letโ€™s get started

Before we start talking about custom model training, letโ€™s see a quick demo of how PyCaret works with out-of-the-box models. I will be using the โ€˜insuranceโ€™ dataset available on PyCaretโ€™s Repository. The goal of this dataset is to predict patient charges based on some attributes.

๐Ÿ‘‰ Dataset

**# read data from pycaret repo
**from pycaret.datasets import get_data
data = get_data('insurance')

๐Ÿ‘‰ Data Preparation

Common to all modules in PyCaret, the setup is the first and the only mandatory step in any machine learning experiment performed in PyCaret. This function takes care of all the data preparation required before training models. Besides performing some basic default processing tasks, PyCaret also offers a wide array of pre-processing features. To learn more about all the preprocessing functionalities in PyCaret, you can see this link.

**# initialize setup
**from pycaret.regression import *
s = setup(data, target = 'charges')

Whenever you initialize the setup function in PyCaret, it profiles the dataset and infers the data types for all input features. If all data types are correctly inferred, you can press enter to continue.

๐Ÿ‘‰ Available Models

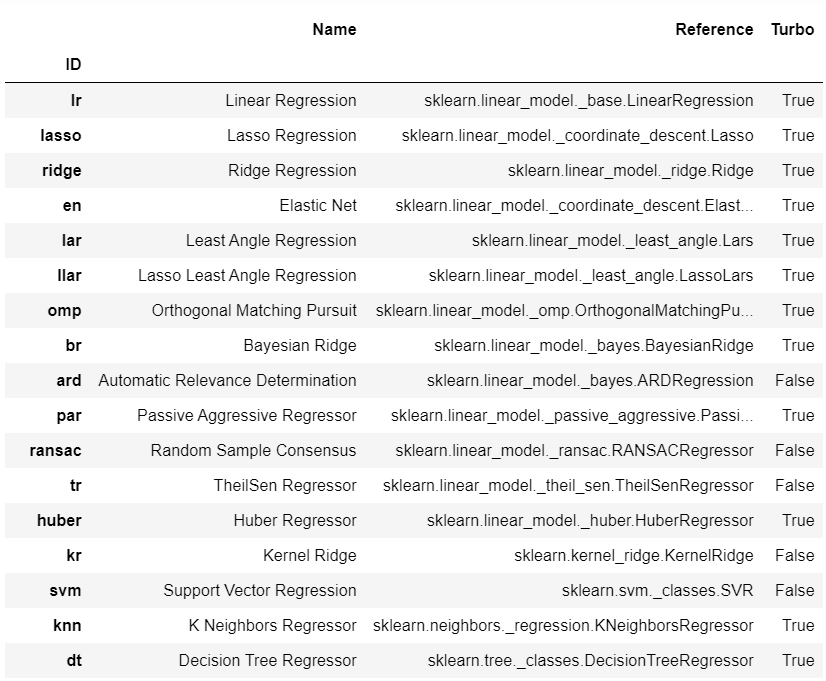
To check the list of all models available for training, you can use the function called models . It displays a table with model ID, name, and the reference of the actual estimator.

**# check all the available models
**models()

๐Ÿ‘‰ Model Training & Selection

The most used function for training any model in PyCaret is create_model . It takes an ID for the estimator you want to train.

**# train decision tree
**dt = create_model('dt')

The output shows the 10-fold cross-validated metrics with mean and standard deviation. The output from this function is a trained model object, which is essentially a scikit-learn object.

print(dt)

To train multiple models in a loop, you can write a simple list comprehension:

**# train multiple models**
multiple_models = [create_model(i) for i in ['dt', 'lr', 'xgboost']]

**# check multiple_models
**type(multiple_models), len(multiple_models)
>>> (list, 3)

print(multiple_models)

If you want to train all the models available in the library instead of the few selected you can use PyCaretโ€™s compare_models function instead of writing your own loop (the results will be the same though).

**# compare all models**
best_model = compare_models()

compare_models returns the output which shows the cross-validated metrics for all models. According to this output, Gradient Boosting Regressor is the best model with $2,702 in Mean Absolute Error ****(MAE) ****using 10-fold cross-validation on the train set.

**# check the best model**
print(best_model)

The metrics shown in the above grid is cross-validation scores, to check the score of the best_modelon hold-out set:

**# predict on hold-out
**pred_holdout = predict_model(best_model)

To generate predictions on the unseen dataset you can use the same predict_model function but just pass an extra parameter data :

**# create copy of data drop target column**
data2 = data.copy()
data2.drop('charges', axis=1, inplace=True)

**# generate predictions
**predictions = predict_model(best_model, data = data2)

๐Ÿ‘‰ Writing and Training Custom Model

So far what we have seen is training and model selection for all the available models in PyCaret. However, the way PyCaret works for custom models is exactly the same. As long as, your estimator is compatible with sklearn API style, it will work the same way. Letโ€™s see few examples.

Before I show you how to write your own custom class, I will first demonstrate how you can work with custom non-sklearn models (models that are not available in sklearn or pycaretโ€™s base library).

๐Ÿ‘‰ GPLearn Models

While Genetic Programming (GP) can be used to perform a very wide variety of tasks, gplearn is purposefully constrained to solving symbolic regression problems.

Symbolic regression is a machine learning technique that aims to identify an underlying mathematical expression that best describes a relationship. It begins by building a population of naive random formulas to represent a relationship between known independent variables and their dependent variable targets to predict new data. Each successive generation of programs is then evolved from the one that came before it by selecting the fittest individuals from the population to undergo genetic operations.

To use models from gplearn you will have to first install it:

**# install gplearn
**pip install gplearn

Now you can simply import the untrained model and pass it in the create_model function:

**# import untrained estimator**
from gplearn.genetic import SymbolicRegressor
sc = SymbolicRegressor()

**# train using create_model
**sc_trained = create_model(sc)
print(sc_trained)

You can also check the hold-out score for this:

**# check hold-out score
**pred_holdout_sc = predict_model(sc_trained)

๐Ÿ‘‰ NGBoost Models

ngboost is a Python library that implements Natural Gradient Boosting, as described in โ€œNGBoost: Natural Gradient Boosting for Probabilistic Predictionโ€. It is built on top of Scikit-Learn and is designed to be scalable and modular with respect to the choice of proper scoring rule, distribution, and base learner. A didactic introduction to the methodology underlying NGBoost is available in this slide deck.

To use models from ngboost, you will have to first install ngboost:

**# install ngboost**
pip install ngboost

Once installed, you can import the untrained estimator from the ngboost library and use create_model to train and evaluate the model:

**# import untrained estimator**
from ngboost import NGBRegressor
ng = NGBRegressor()

**# train using create_model
**ng_trained = create_model(ng)
print(ng_trained)

๐Ÿ‘‰ Writing Custom Class

The above two examples gplearn and ngboost are custom models for pycaret as they are not available in the default library but you can use them just like you can use any other out-of-the-box models. However, there may be a use-case that involves writing your own algorithm (i.e. maths behind the algorithm), in which case you can inherit the base class from sklearn and write your own maths.

Letโ€™s create a naive estimator which learns the mean value of target variable during fit stage and predicts the same mean value for all new data points, irrespective of X input (probably not useful in real life, but just to make demonstrate the functionality).

**# create custom estimator**
import numpy as np**
**from sklearn.base import BaseEstimator

class MyOwnModel(BaseEstimator):
    
    def __init__(self):
        self.mean = 0
        
    def fit(self, X, y):
        self.mean = y.mean()
        return self
    
    def predict(self, X):
        return np.array(X.shape[0]*[self.mean])

Now letโ€™s use this estimator for training:

**# import MyOwnModel class**
mom = MyOwnModel()

**# train using create_model
**mom_trained = create_model(mom)
**# generate predictions on data**
predictions = predict_model(mom_trained, data=data)

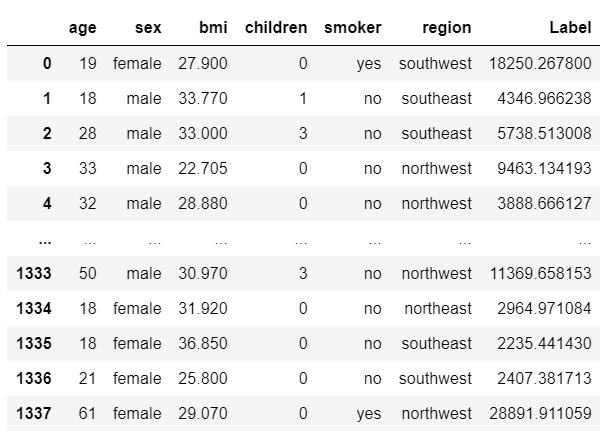
Notice that Label column which is essentially the prediction is the same number $13,225 for all the rows, thatโ€™s because we created this algorithm in such a way, that learns from the mean of train set and predict the same value (just to keep things simple).

I hope that you will appreciate the ease of use and simplicity in PyCaret. In just a few lines, you can perform end-to-end machine learning experiments and write your own algorithms without adjusting any native code.

Coming Soon!

Next week I will be writing a tutorial to advance this tutorial. We will write a more complex algorithm instead of just a mean prediction. I will introduce some complex concepts in the next tutorial. Please follow me on Medium, LinkedIn, and Twitter to get more updates.

There is no limit to what you can achieve using this lightweight workflow automation library in Python. If you find this useful, please do not forget to give us โญ๏ธ on our GitHub repository.

To hear more about PyCaret follow us on LinkedIn and Youtube.

Join us on our slack channel. Invite link here.

You may also be interested in:

Build your own AutoML in Power BI using PyCaret 2.0 Deploy Machine Learning Pipeline on Azure using Docker Deploy Machine Learning Pipeline on Google Kubernetes Engine Deploy Machine Learning Pipeline on AWS Fargate Build and deploy your first machine learning web app Deploy PyCaret and Streamlit app using AWS Fargate serverless Build and deploy machine learning web app using PyCaret and Streamlit Deploy Machine Learning App built using Streamlit and PyCaret on GKE

Documentation Blog GitHub StackOverflow Install PyCaret Notebook Tutorials Contribute in PyCaret

Want to learn about a specific module?

Click on the links below to see the documentation and working examples.

Classification Regression Clustering Anomaly Detection Natural Language Processing Association Rule Mining

Last updated