> For the complete documentation index, see [llms.txt](https://pycaret.gitbook.io/docs/llms.txt). Markdown versions of documentation pages are available by appending `.md` to page URLs; this page is available as [Markdown](https://pycaret.gitbook.io/docs/learn-pycaret/official-blog/deploy-ml-app-on-google-kubernetes.md).
# Deploy ML App on Google Kubernetes
### Deploy Machine Learning App built using Streamlit and PyCaret on Google Kubernetes Engine
#### A step-by-step beginner’s guide to containerize and deploy a Streamlit app on Google Kubernetes Engine
#### by Moez Ali
### RECAP
In our [last post](https://towardsdatascience.com/build-and-deploy-machine-learning-web-app-using-pycaret-and-streamlit-28883a569104) on deploying a machine learning pipeline in the cloud, we demonstrated how to develop a machine learning pipeline in PyCaret and deploy a trained model on Heroku PaaS as a web application built using a Streamlit open-source framework. If you haven’t heard about PyCaret before, you can read this [announcement](https://towardsdatascience.com/announcing-pycaret-an-open-source-low-code-machine-learning-library-in-python-4a1f1aad8d46) to learn more.
In this tutorial, we will use the same machine learning pipeline and Streamlit app and demonstrate how to containerize and deploy them onto Google Kubernetes Engine.
By the end of this tutorial, you will be able to build and host a fully functional containerized web app on Google Kubernetes Engine. This web app can be used to generate online predictions (one-by-one) and predictions by batch (by uploading a csv file) using a trained machine learning model. The final app looks like this:

### 👉 What you will learn in this tutorial
* What is a Container, what is Docker, what is Kubernetes, and what is Google Kubernetes Engine?
* Build a Docker image and upload it onto Google Container Registry (GCR).
* Create a cluster on GCP and deploy a machine learning app as a web service.
* See a web app in action that uses a trained machine learning pipeline to predict new data points in real time.
In the past, we have covered containerization using docker and deployment on cloud platforms like Azure, GCP and AWS. If you are interested in learning more about those, you can read the following tutorials:
* [Build and deploy machine learning web app using PyCaret and Streamlit](https://towardsdatascience.com/build-and-deploy-machine-learning-web-app-using-pycaret-and-streamlit-28883a569104)
* [Deploy Machine Learning Pipeline on AWS Fargate](https://towardsdatascience.com/deploy-machine-learning-pipeline-on-aws-fargate-eb6e1c50507)
* [Deploy Machine Learning Pipeline on Google Kubernetes Engine](https://towardsdatascience.com/deploy-machine-learning-model-on-google-kubernetes-engine-94daac85108b)
* [Deploy Machine Learning Pipeline on AWS Web Service](https://towardsdatascience.com/deploy-machine-learning-pipeline-on-cloud-using-docker-container-bec64458dc01)
* [Build and deploy your first machine learning web app on Heroku PaaS](https://towardsdatascience.com/build-and-deploy-your-first-machine-learning-web-app-e020db344a99)
### 💻 Toolbox for this tutorial
### PyCaret
[PyCaret](https://www.pycaret.org/) is an open source, low-code machine learning library in Python that is used to train and deploy machine learning pipelines and models into production. PyCaret can be installed easily using pip.
```
pip install **pycaret**
```
### Streamlit
[Streamlit](https://www.streamlit.io/) is an open-source Python library that makes it easy to build beautiful custom web-apps for machine learning and data science. Streamlit can be installed easily using pip.
```
pip install **streamlit**
```
### Google Cloud Platform
Google Cloud Platform (GCP), offered by Google, is a suite of cloud computing services that runs on the same infrastructure that Google uses internally for its end-user products, such as Google Search, Gmail and YouTube. If you do not have an account with GCP, you can sign-up [here](https://console.cloud.google.com/getting-started). If you are signing up for the first time you will get free credits for 1 year.
### Let’s get started.
Before we get into Kubernetes, let’s understand what a container is and why we would need one?

Have you ever had the problem where your code works fine on your computer but when a friend tries to run the exact same code, it doesn’t work? If your friend is repeating the exact same steps, he or she should get the same results, right? The one-word answer to this is \*\**the environment*. \*\*Your friend’s environment is different than yours.
What does an environment include? → A programing language such as Python and all the libraries and dependencies with the exact versions used when the application was built and tested.
If we can create an environment that we can transfer to other machines (for example: your friend’s computer or a cloud service provider like Google Cloud Platform), we can reproduce the results anywhere. Hence, \*\*\*a \*\*\*\*container \*\*\*is a type of software that packages up an application and all its dependencies so the application runs reliably from one computing environment to another.
> ***What’s Docker then?***
\*\*Docker \*\*is a company that provides software (also called Docker) that allows users to build, run and manage containers. While Docker’s container are the most common, there are other less famous *alternatives* such as [LXD](https://linuxcontainers.org/lxd/introduction/) and [LXC](https://linuxcontainers.org/) that also provide container solutions.
Now that you understand containers and docker specifically, let’s understand what Kubernetes is all about.
### What is Kubernetes?
Kubernetes is a powerful open-source system developed by Google back in 2014, for managing containerized applications. In simple words, Kubernetes \*\*\*\*is a system for running and coordinating containerized applications across a cluster of machines. It is a platform designed to completely manage the life cycle of containerized applications.

### Features
✔️ \*\*Load Balancing: \*\*Automatically distributes the load between containers.
✔️ \*\*Scaling: \*\*Automatically scale up or down by adding or removing containers when demand changes such as peak hours, weekends and holidays.
✔️ \*\*Storage: \*\*Keeps storage consistent with multiple instances of an application.
✔️ **Self-healing** Automatically restarts containers that fail and kills containers that don’t respond to your user-defined health check.
✔️ \*\*Automated Rollouts \*\*you can automate Kubernetes to create new containers for your deployment, remove existing containers and adopt all of their resources to the new container.
### Why do you need Kubernetes if you have Docker?
Imagine a scenario where you have to run multiple docker containers on multiple machines to support an enterprise level ML application with varied workloads during day and night. As simple as it may sound, it is a lot of work to do manually.
You need to start the right containers at the right time, figure out how they can talk to each other, handle storage considerations, and deal with failed containers or hardware. This is the problem Kubernetes is solving by allowing large numbers of containers to work together in harmony, reducing the operational burden.
### What is Google Kubernetes Engine?
Google Kubernetes Engine is an implementation of *Google’s open source Kubernetes* on Google Cloud Platform. Simple!
Other popular alternatives to GKE are [Amazon ECS](https://aws.amazon.com/ecs/) and [Microsoft Azure Kubernetes Service](https://azure.microsoft.com/en-us/services/kubernetes-service/).
### One final time, do you understand this?
* \*\*A Container \*\*is a type of software that packages up an application and all its dependencies so the application runs reliably from one computing environment to another.
* \*\*Docker \*\*is a software used for building and managing containers.
* \*\*Kubernetes \*\*is an open-source system for managing containerized applications in a clustered environment.
* **Google Kubernetes Engine** is an implementation of the open source Kubernetes framework on Google Cloud Platform.
In this tutorial, we will use Google Kubernetes Engine. In order to follow along, you must have a Google Cloud Platform account. [Click here](https://console.cloud.google.com/getting-started) to sign-up for free.
### Setting the Business Context
An insurance company wants to improve its cash flow forecasting by better predicting patient charges using demographic and basic patient health risk metrics at the time of hospitalization.
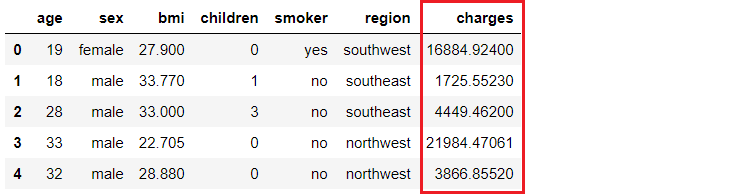
*(*[*data source*](https://www.kaggle.com/mirichoi0218/insurance#insurance.csv)*)*
### Objective
To build a web application that supports online (one-by-one) as well as batch prediction using trained machine learning model and pipeline.
### Tasks
* Train, validate and develop a machine learning pipeline using PyCaret.
* Build a front-end web application with two functionalities: (i) online prediction and (ii) batch prediction.
* Create a Dockerfile
* Deploy the web app on Google Kubernetes Engine. Once deployed, it will become publicly available and can be accessed via Web URL.
### 👉 Task 1 — Model Training and Validation
Training and model validation are performed in an Integrated Development Environment (IDE) or Notebook either on your local machine or on cloud. If you haven’t used PyCaret before, [click here](https://towardsdatascience.com/announcing-pycaret-an-open-source-low-code-machine-learning-library-in-python-4a1f1aad8d46) to learn more about PyCaret or see [Getting Started Tutorials](https://www.pycaret.org/tutorial) on our [website](https://www.pycaret.org/).
In this tutorial, we have performed two experiments. The first experiment is performed with default preprocessing settings in PyCaret. The second experiment has some additional preprocessing tasks such as **scaling and normalization, automatic feature engineering and binning continuous data into intervals**. See the setup code for the second experiment:
```
**# Experiment No. 2**
from **pycaret.regression** import *****
r2 = **setup**(data, target = 'charges', session_id = 123,
normalize = True,
polynomial_features = True, trigonometry_features = True,
feature_interaction=True,
bin_numeric_features= ['age', 'bmi'])
```

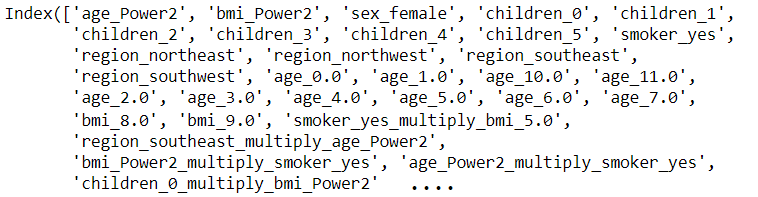
The magic happens with only a few lines of code. Notice that in **Experiment 2** the transformed dataset has 62 features for training derived from only 6 features in the original dataset. All of the new features are the result of transformations and automatic feature engineering in PyCaret.
Sample code for model training in PyCaret:
```
# Model Training and Validation
lr = **create_model**('lr')
```
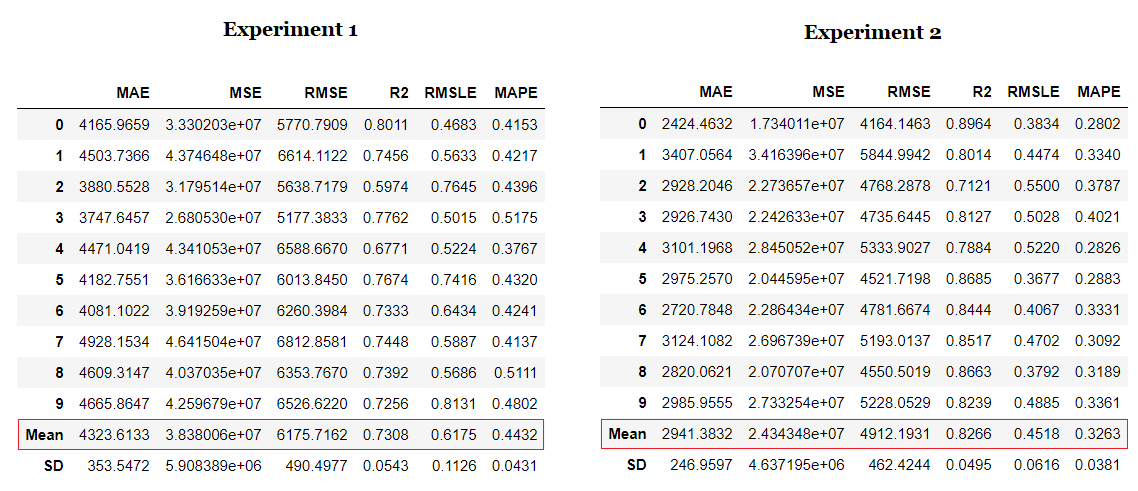
Notice the impact of transformations and automatic feature engineering. The R2 has increased by 10% with very little effort. We can compare the **residual plot** of linear regression model for both experiments and observe the impact of transformations and feature engineering on the \*\*heteroskedasticity \*\*of model.
```
# plot residuals of trained model**
plot_model**(lr, plot = 'residuals')
```

Machine learning is an iterative process. The number of iterations and techniques used within are dependent on how critical the task is and what the impact will be if predictions are wrong. The severity and impact of a machine learning model to predict a patient outcome in real-time in the ICU of a hospital is far more than a model built to predict customer churn.
In this tutorial, we have performed only two iterations and the linear regression model from the second experiment will be used for deployment. At this stage, however, the model is still only an object within a Notebook / IDE. To save it as a file that can be transferred to and consumed by other applications, execute the following code:
```
# save transformation pipeline and model
**save_model**(lr, model_name = 'deployment_28042020')
```
When you save a model in PyCaret, the entire transformation pipeline based on the configuration defined in the \*\*setup() \*\*function is created. All inter-dependencies are orchestrated automatically. See the pipeline and model stored in the ‘deployment\_28042020’ variable:

We have finished training and model selection. The final machine learning pipeline and linear regression model is now saved as a pickle file (deployment\_28042020.pkl) that will be used in a web application to generate predictions on new datapoints.
### 👉 Task 2 — Build a front-end web application
Now that our machine learning pipeline and model are ready to start building a front-end web application that can generate predictions on new datapoints. This application will support ‘Online’ as well as ‘Batch’ predictions through a csv file upload. Let’s breakdown the application code into three main parts:
### Header / Layout
This section imports libraries, loads the trained model and creates a basic layout with a logo on top, a jpg image and a dropdown menu on the sidebar to toggle between ‘Online’ and ‘Batch’ prediction.
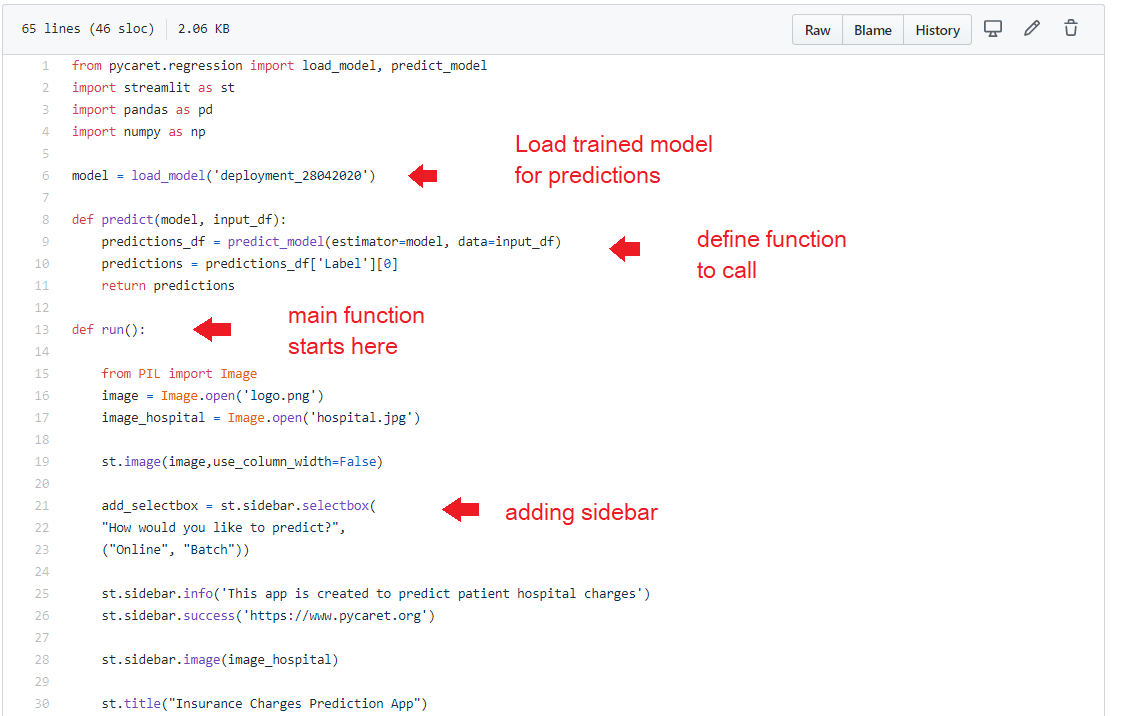
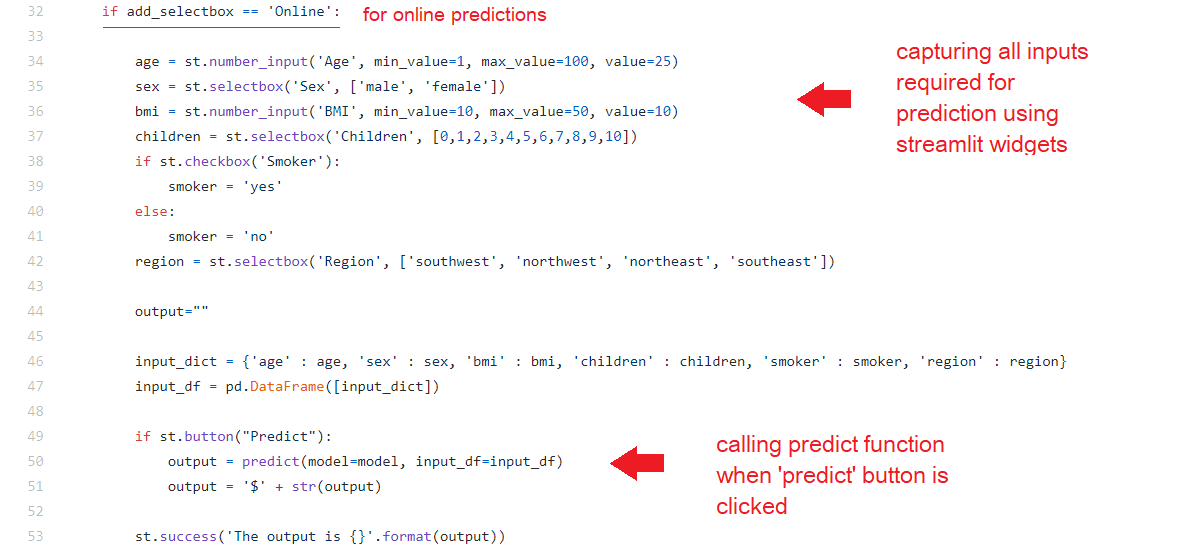
### Online Predictions
This section deals with the initial app function, Online one-by-one predictions. We are using streamlit widgets such as *number input, text input, drop down menu and checkbox* to collect the datapoints used to train the model such as Age, Sex, BMI, Children, Smoker, Region.
### Batch Predictions
Predictions by batch is the second layer of the app’s functionality. The **file\_uploader** widget in streamlit is used to upload a csv file and then called the native \*\*predict\_model() \*\*function from PyCaret to generate predictions that are displayed using streamlit’s write() function.

If you remember from Task 1 above we finalized a linear regression model that was trained on 62 features that were extracted from the 6 original features. The front-end of web application has an input form that collects only the six features i.e. age, sex, bmi, children, smoker, region.
How do we transform these 6 features of a new data points into the 62 used to train the model? We do not need to worry about this part as PyCaret automatically handles this by orchestrating the transformation pipeline. When you call the predict function on a model trained using PyCaret, all transformations are applied automatically (in sequence) before generating predictions from the trained model.
\*\*Testing App \*\*One final step before we publish the application on Heroku is to test the web app locally. Open Anaconda Prompt and navigate to your project folder and execute the following code:
```
**streamlit** run app.py
```


Now that we have a fully functional web application, we can start the process of containerizing and deploying the app on Google Kubernetes Engine.
### 👉 Task 3 — Create a Dockerfile
To containerize our application for deployment we need a docker image that becomes a container at runtime. A docker image is created using a Dockerfile. A Dockerfile is just a file with a set of instructions. The Dockerfile for this project looks like this:
The last part of this Dockerfile (starting at line 23) is Streamlit specific and not needed generally. Dockerfile is case-sensitive and must be in the project folder with the other project files.
### 👉 Task 4 — Deploy a ML pipeline on GKE:
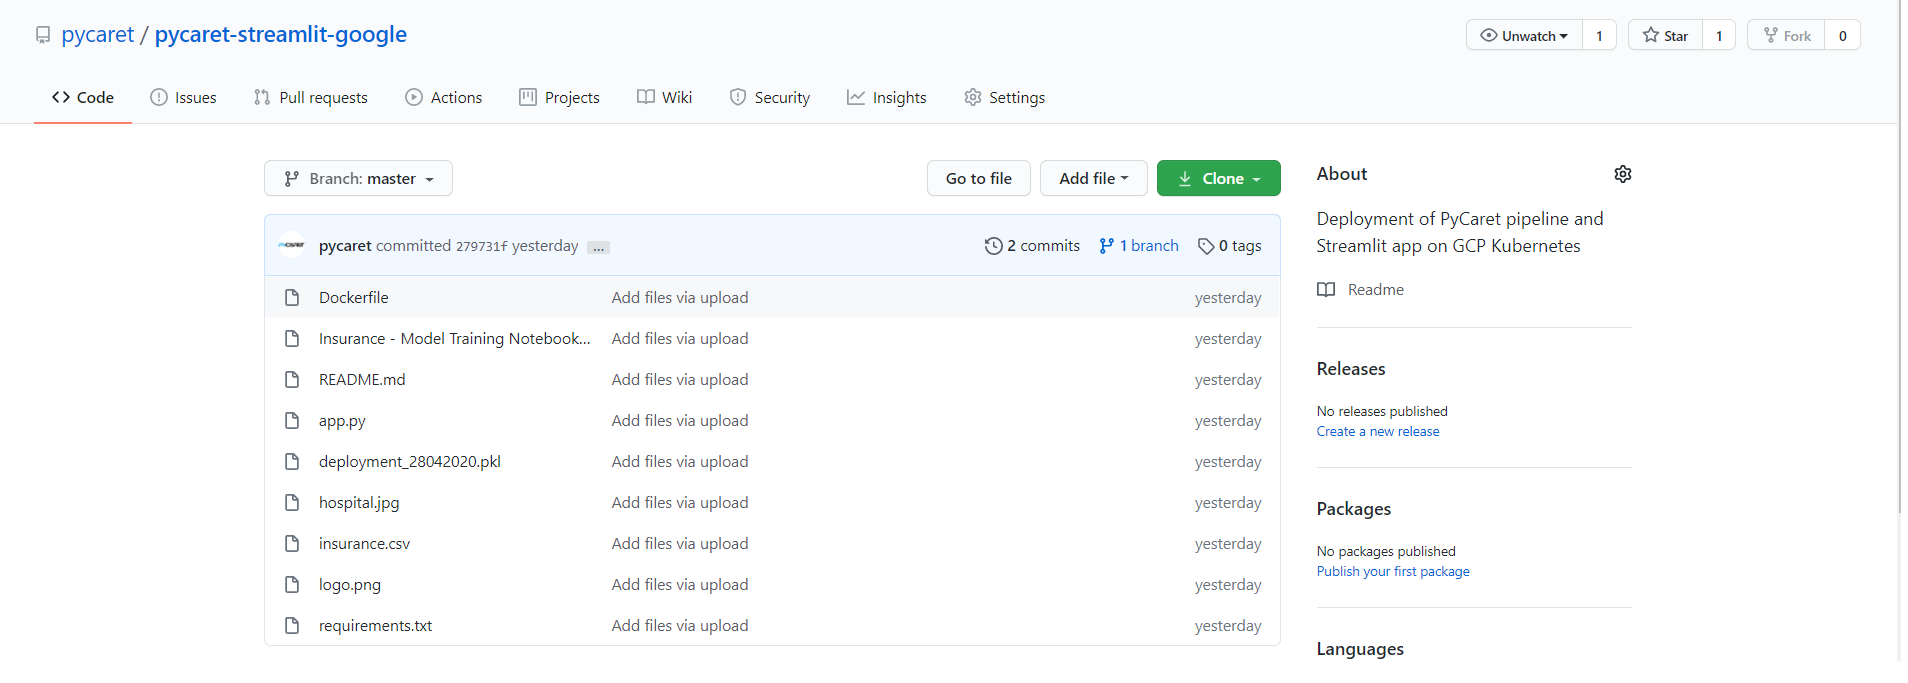
If you would like to follow along you will have to fork this [repository](https://github.com/pycaret/pycaret-streamlit-google) from GitHub.
Follow through these simple 10 steps to deploy app on GKE Cluster.
#### Step 1 — Create a new project in GCP Console
Sign-in to your GCP console and go to Manage Resources
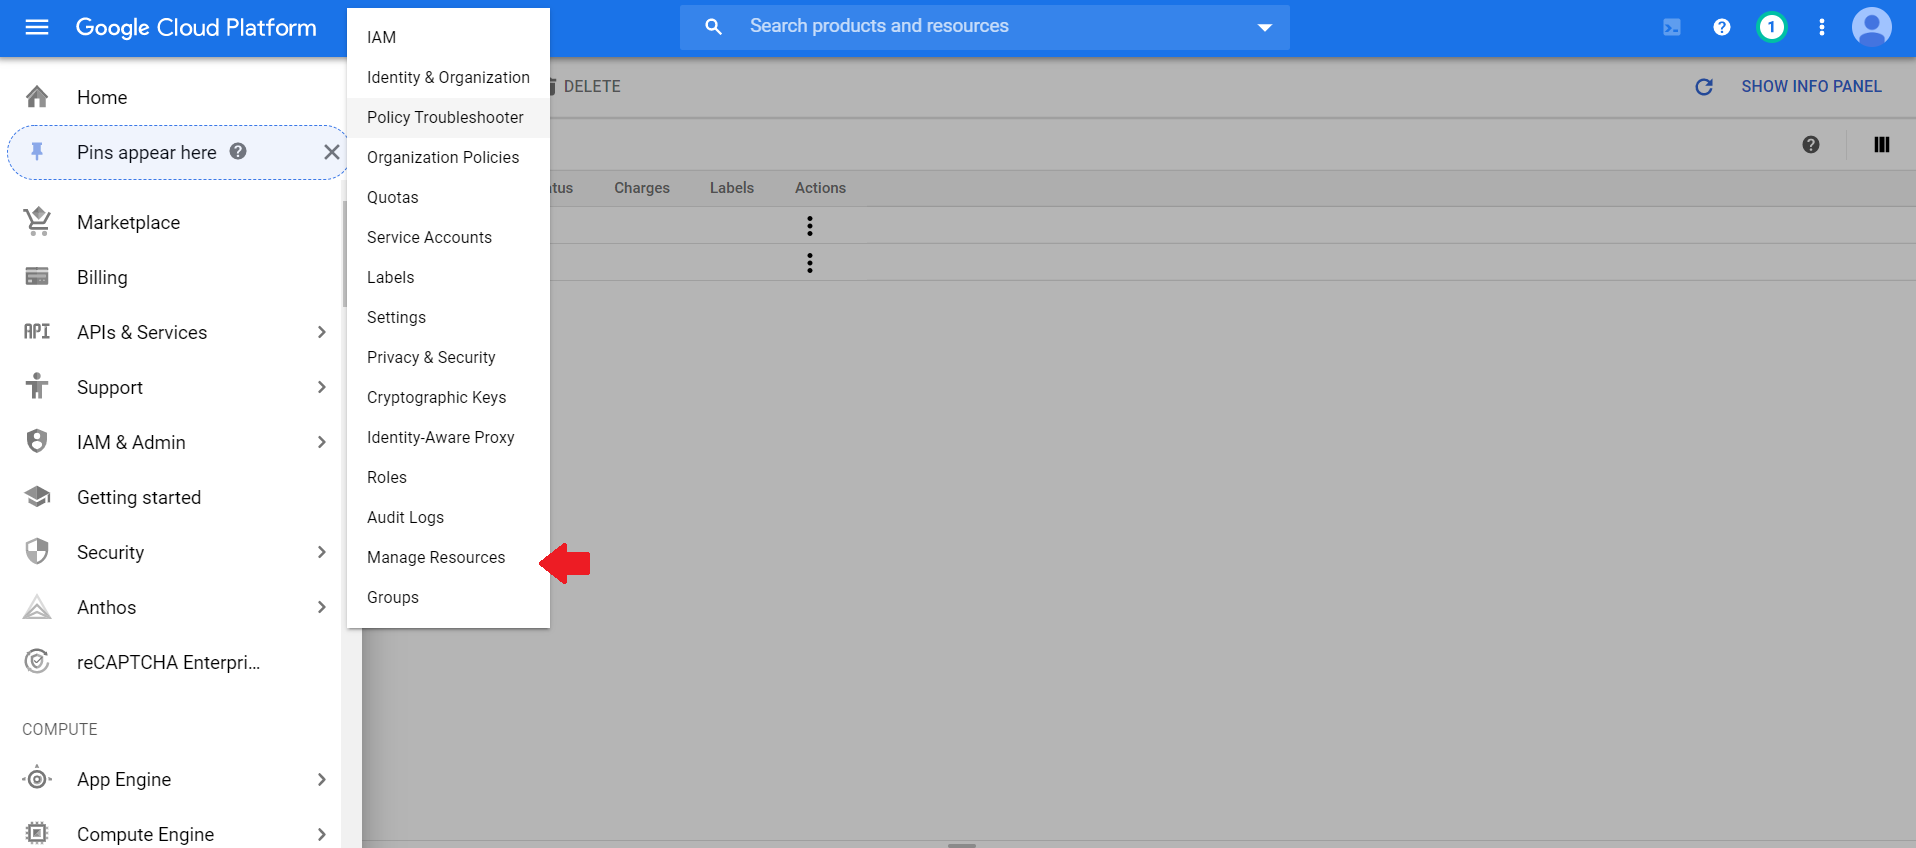
Click on **Create New Project**

#### Step 2 — Import Project Code
Click the \*\*Activate Cloud Shell \*\*button at the top right of the console window to open the Cloud Shell.
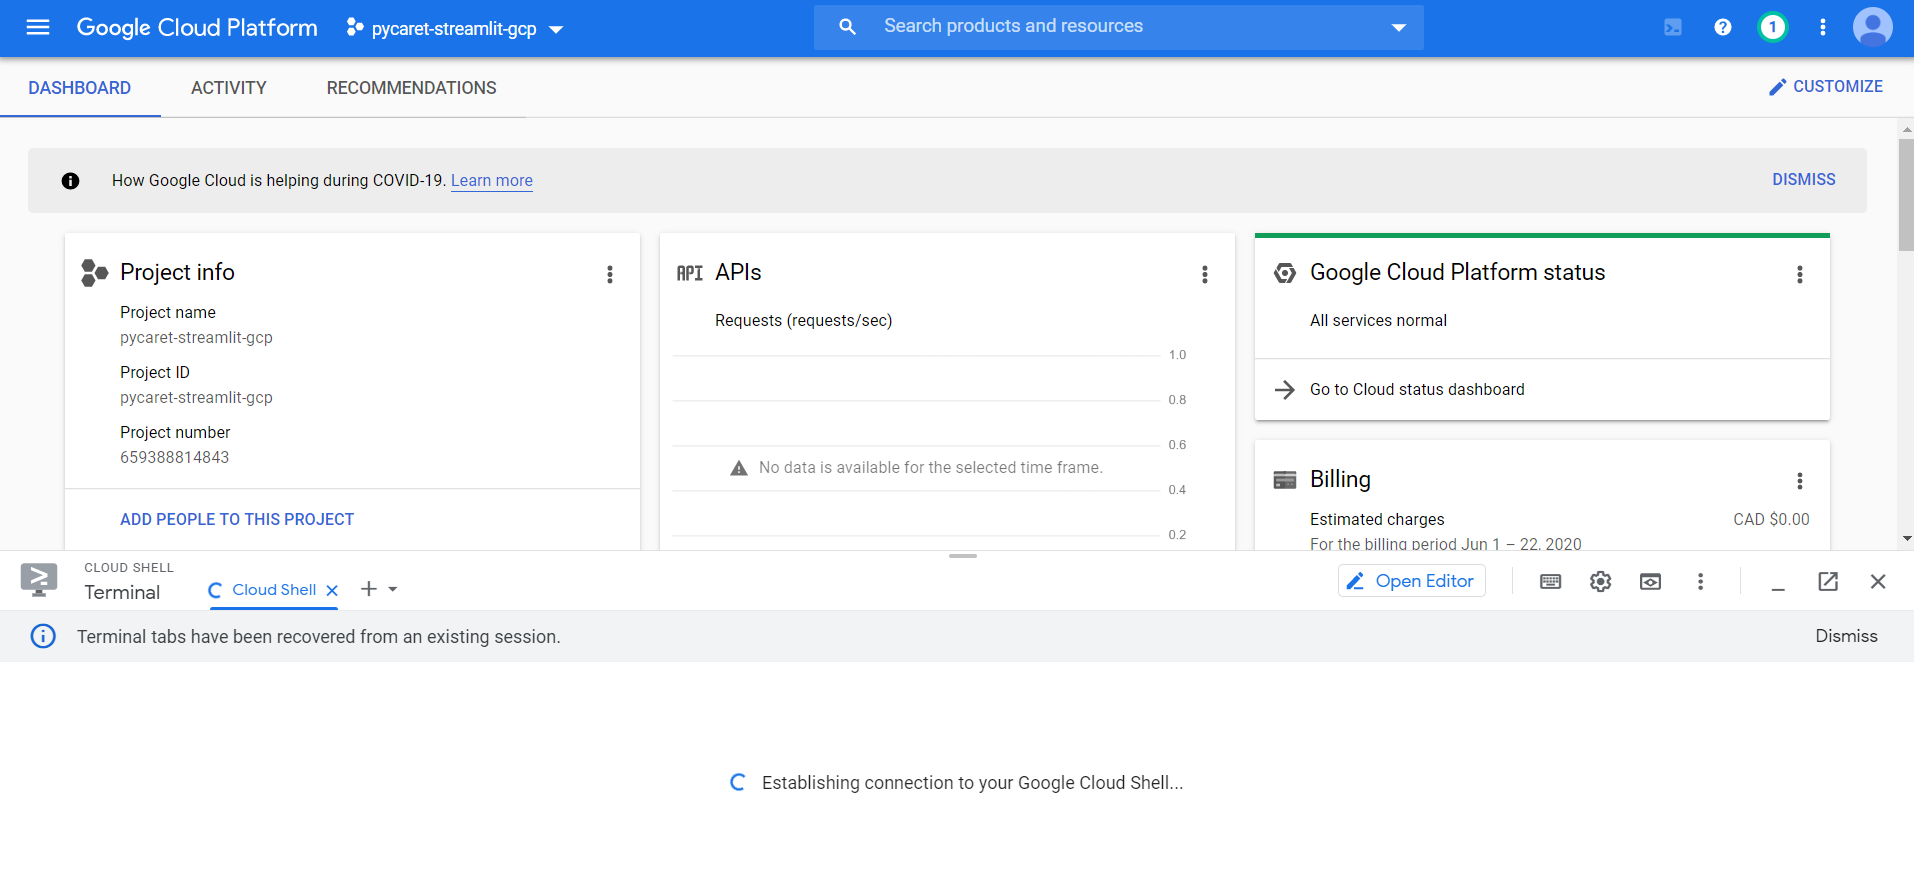
Execute the following code in Cloud Shell to clone the GitHub repository used in this tutorial.
```
git clone [https://github.com/pycaret/pycaret-streamlit-google.git](https://github.com/pycaret/pycaret-streamlit-google.git)
```
#### Step 3 — Set Project ID Environment Variable
Execute the following code to set the PROJECT\_ID environment variable.
```
export PROJECT_ID=**pycaret-streamlit-gcp**
```
*pycaret-streamlit-gcp* is the name of the project we chose in step 1 above.
#### Step 4 — Build the docker image
Build the docker image of the application and tag it for uploading by executing the following code:
```
docker build -t gcr.io/${PROJECT_ID}/insurance-streamlit:v1 .
```

You can check the available images by running the following code:
```
**docker **images
```
#### Step 5 — Upload the container image
1. Authenticate to [Container Registry](https://cloud.google.com/container-registry) (you need to run this only once):
gcloud auth configure-docker
2. Execute the following code to upload the docker image to Google Container Registry:
docker push gcr.io/${PROJECT\_ID}/insurance-streamlit:v1
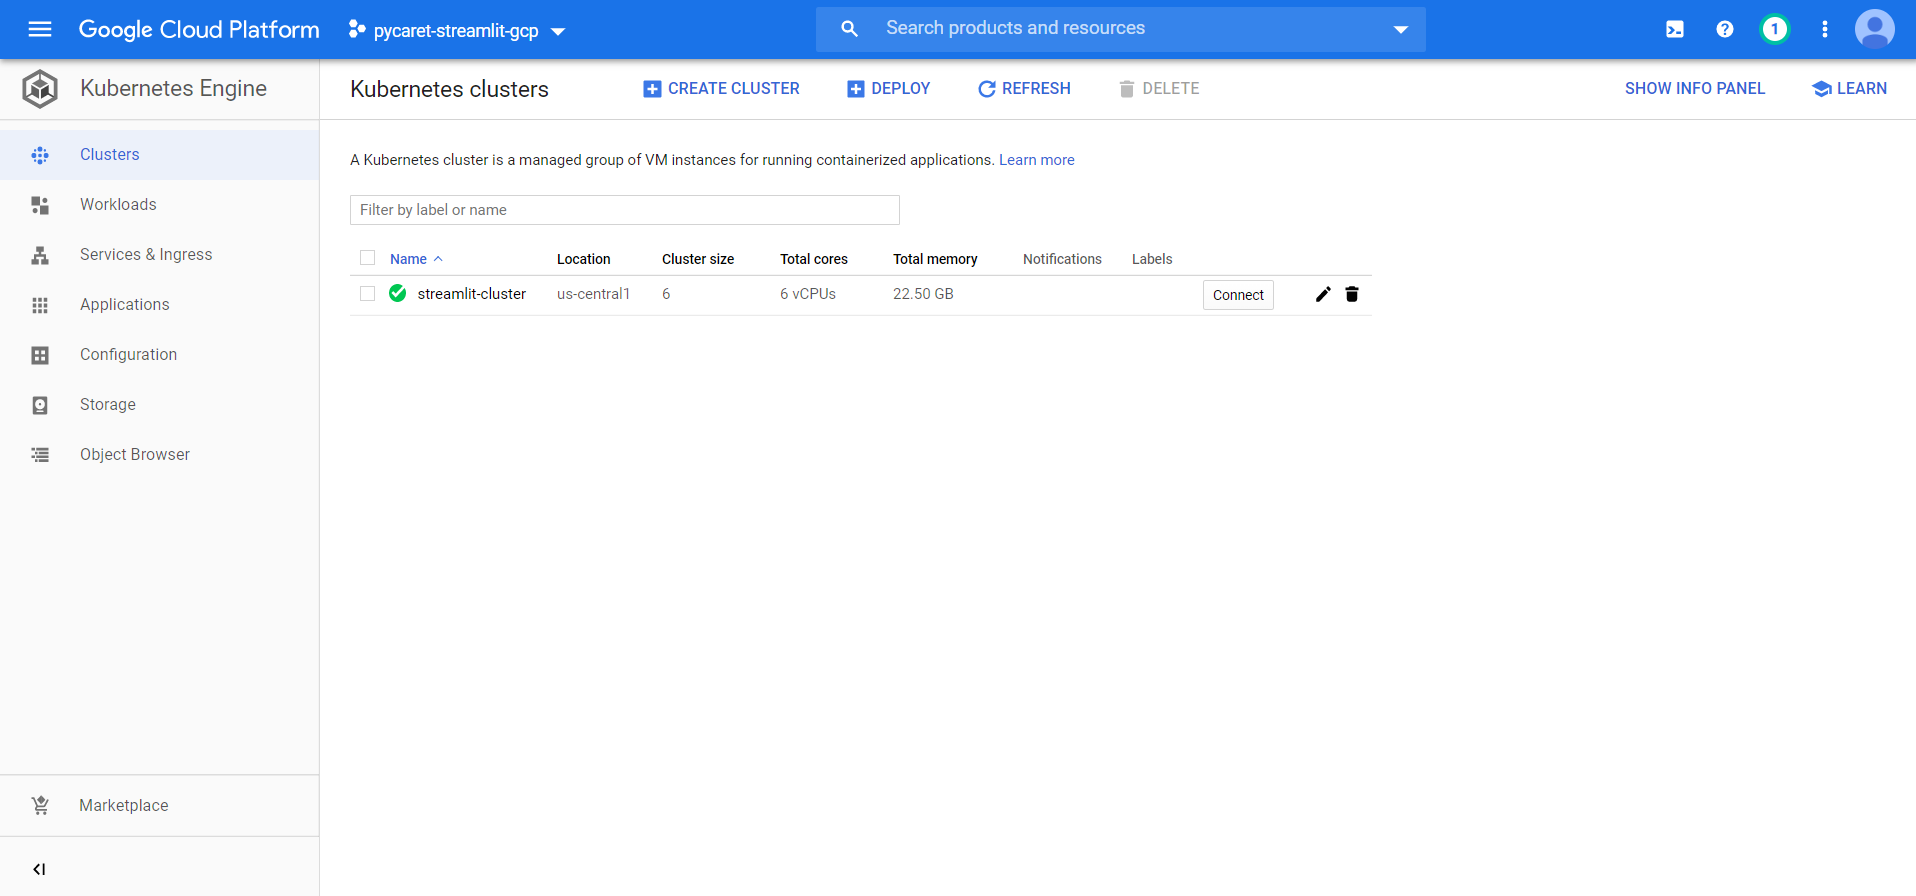
#### Step 6 — Create Cluster
Now that the container is uploaded, you need a cluster to run the container. A cluster consists of a pool of Compute Engine VM instances, running Kubernetes.
1. Set your project ID and Compute Engine zone options for the gcloud tool:
gcloud config set project $PROJECT\_ID gcloud config set compute/zone **us-central1**
2. Create a cluster by executing the following code:
gcloud container clusters create **streamlit-cluster** --num-nodes=2
#### Step 7 — Deploy Application
To deploy and manage applications on a GKE cluster, you must communicate with the Kubernetes cluster management system. Execute the following command to deploy the application:
```
kubectl create deployment insurance-streamlit --image=gcr.io/${PROJECT_ID}/insurance-streamlit:v1
```
#### Step 8 — Expose your application to the internet
By default, the containers you run on GKE are not accessible from the internet because they do not have external IP addresses. Execute the following code to expose the application to the internet:
```
kubectl expose deployment insurance-streamlit --type=LoadBalancer --port 80 --target-port **8501**
```
#### Step 9 — Check Service
Execute the following code to get the status of the service. **EXTERNAL-IP** is the web address you can use in browser to view the published app.
```
kubectl get service
```
#### Step 10 — See the app in action on web address


**Note:** By the time this story is published, the app will be removed from the public address to restrict resource consumption.
[Link to GitHub Repository for this tutorial](https://github.com/pycaret/pycaret-streamlit-google)
[Link to GitHub Repository for Microsoft Azure Deployment](https://www.github.com/pycaret/pycaret-azure-deployment)
[Link to GitHub Repository for Heroku Deployment](https://www.github.com/pycaret/deployment-heroku)
### PyCaret 2.0.0 is coming!
We have received overwhelming support and feedback from the community. We are actively working on improving PyCaret and preparing for our next release. **PyCaret 2.0.0 will be bigger and better**. If you would like to share your feedback and help us improve further, you may [fill this form](https://www.pycaret.org/feedback) on the website or leave a comment on our [GitHub ](https://www.github.com/pycaret/)or [LinkedIn](https://www.linkedin.com/company/pycaret/) page.
Follow our [LinkedIn](https://www.linkedin.com/company/pycaret/) and subscribe to our [YouTube](https://www.youtube.com/channel/UCxA1YTYJ9BEeo50lxyI_B3g) channel to learn more about PyCaret.
### Want to learn about a specific module?
As of the first release 1.0.0, PyCaret has the following modules available for use. Click on the links below to see the documentation and working examples in Python.
[Classification](https://www.pycaret.org/classification) [Regression ](https://www.pycaret.org/regression)[Clustering](https://www.pycaret.org/clustering) [Anomaly Detection ](https://www.pycaret.org/anomaly-detection)[Natural Language Processing](https://www.pycaret.org/nlp) [Association Rule Mining](https://www.pycaret.org/association-rules)
### Also see:
PyCaret getting started tutorials in Notebook:
[Classification](https://www.pycaret.org/clf101) [Regression](https://www.pycaret.org/reg101) [Clustering](https://www.pycaret.org/clu101) [Anomaly Detection](https://www.pycaret.org/anom101) [Natural Language Processing](https://www.pycaret.org/nlp101) [Association Rule Mining](https://www.pycaret.org/arul101)
### Would you like to contribute?
PyCaret is an open source project. Everybody is welcome to contribute. If you would like to contribute, please feel free to work on [open issues](https://github.com/pycaret/pycaret/issues). Pull requests are accepted with unit tests on dev-1.0.1 branch.
Please give us ⭐️ on our [GitHub repo](https://www.github.com/pycaret/pycaret) if you like PyCaret.
Medium: [https://medium.com/@moez\_62905/](https://medium.com/@moez_62905/machine-learning-in-power-bi-using-pycaret-34307f09394a)
LinkedIn:
Twitter:
---
# Agent Instructions
This documentation is published with GitBook. GitBook is the documentation platform designed so that both humans and AI agents can read, navigate, and reason over technical content effectively. Learn more at gitbook.com.
## Querying This Documentation
If you need additional information that is not directly available in this page, you can query the documentation dynamically by asking a question.
Perform an HTTP GET request on the current page URL with the `ask` query parameter, and the optional `goal` query parameter:
```
GET https://pycaret.gitbook.io/docs/learn-pycaret/official-blog/deploy-ml-app-on-google-kubernetes.md?ask=&goal=
```
`ask` is the immediate question: it should be specific, self-contained, and written in natural language.
`goal` is optional and describes the broader end goal you are ultimately trying to accomplish on behalf of the user. GitBook uses it to tailor the answer towards what is most useful for that goal.
The response will contain a direct answer to the question and relevant excerpts and sources from the documentation.
Use this mechanism when the answer is not explicitly present in the current page, you need clarification or additional context, or you want to retrieve related documentation sections.